728x90
출처: https://velog.io/@devwook/rustreact-2.-ACTIX-WEB-tutorial
https://actix.rs/docs/getting-started/
백엔드에 대한 첫번째 경험이 rust라는 것이 살짝 두렵기는 하다.
1. hello-world
간단한 구현 예시이다.
#[get("/")]
async fn hello() -> impl Responder {
    HttpResponse::Ok().body("Hello world!")
}

#[post("/echo")]
async fn echo(req_body: String) -> impl Responder {
    HttpResponse::Ok().body(req_body)
}

async fn manual_hello() -> impl Responder {
    HttpResponse::Ok().body("Hey there!")
}

async fn manual_hello2() -> impl Responder {
    HttpResponse::Ok().body("Hey there2!")
}
#[actix_web::main]
async fn main() -> std::io::Result<()> {
    HttpServer::new(|| {
        App::new()
            .service(hello)
            .service(echo)
            .route("/hey", web::get().to(manual_hello))
            .route("/hey2", web::get().to(manual_hello2))
            // .service(echo_add)
            // .route("/hey_add", web::get().to(manual_hello2))

    })
    .bind("127.0.0.1:8080")?
    .run()
    .await
}
service는 매크로를 통해 구현할 경우, route는 사용자가 직접 구현을 원할 경우 사용한다.
즉 manual_hello()를
#[get("/hey")]
async fn manual_hello() -> impl Responder {
    HttpResponse::Ok().body("Hey there!")
}
로 변경하고
.service(manual_hello)를 사용해도 된다.
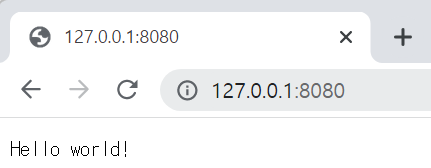
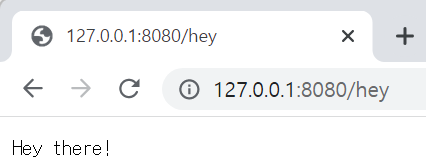
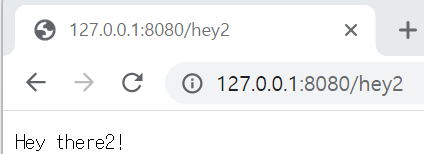
실행 결과는 위와 같다.
2. scope
web::scope 기능을 사용해보는 예시이다.
use actix_web::{get, post, web, App, HttpResponse, HttpServer, Responder};

async fn index() -> impl Responder{
    "Hello World"
}
async fn intro() -> impl Responder{
    HttpResponse::Ok().body("this is introduction")
}
#[actix_web::main]
async fn main() -> std::io::Result<()> {
    HttpServer::new(|| {
        App::new().service(
            web::scope("/app")
                .route("/index.html", web::get().to(index))
                .route("/intro.html", web::get().to(intro))
        )
    })
    .bind("127.0.0.1:8080")?
    .run()
    .await
}
scope를 통해 뒤에 나오는 모든 route들을 /app/some 으로 진행되도록 만든다.
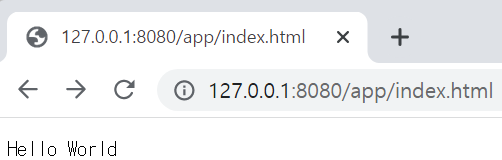
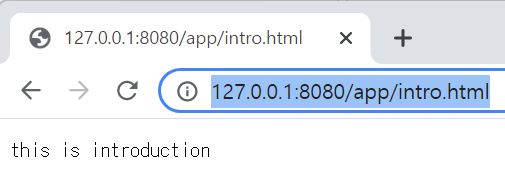
코드의 직관성이 높아진다는 장점이 있다. 코드를 조금 추가해보면 알 수 있는데,
async fn main() -> std::io::Result<()> {
    HttpServer::new(|| {
        App::new().service(
            web::scope("/app")
                .route("/index.html", web::get().to(index))
                .route("/intro.html", web::get().to(intro))
        ).service(
            web::scope("/behind")
                .route("/index_test.html",web::get().to(index_test))
                .route("/intro_test.html",web::get().to(intro_test))
        )
    })
    .bind("127.0.0.1:8080")?
    .run()
    .await
}
어떤 기능을 하게 될지 깔끔하게 파악할 수 있다.
3. State
use actix_web::{get, web, App, HttpServer};
// This struct represents state
struct AppState {
app_name: String,
some_number: usize,
}
#[get("/")]
async fn index(data: web::Data<AppState>) -> String{
let app_name = &data.app_name;
let some_number= &data.some_number;
format!("hello {} , version is {}",app_name,some_number)
}
#[actix_web::main]
async fn main() -> std::io::Result<()> {
HttpServer::new(||{
App::new()
.data(AppState{
app_name: String::from("Actix-web"),
some_number: 8,
})
.service(index)
})
.bind("127.0.0.1:8080")?
.run()
.await
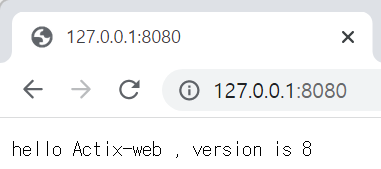
}web이 공유하는 data를 다루는 경우이다.
실행시 다음과 같다.
3.1 Shared Mutable State
여러 thread사이에 공유되는 데이터를 만드는 예제이다.
web::data가 기본적으로 Arc를 사용하므로, 충돌을 피하기 위해서
web::app_data를 사용한다.
use actix_web::{web, App, HttpServer};
use std::sync::Mutex;


struct AppStateWithCounter {
    counter : Mutex<i32>, // 전달을 위해 Mutex 사용
}

async fn index(data: web::Data<AppStateWithCounter> ) -> String{
    let mut counter = data.counter.lock().unwrap(); // lock으로 권한 획득 , unwrap으로 Mutex guard 획득
    *counter +=1; // access  Mutex Guard

    format!("this is counter : {}", counter)
}

#[actix_web::main]
async fn main() -> std::io::Result<()> {
    let counter = web::Data::new(AppStateWithCounter{
        counter: Mutex::new(0),
    });

    HttpServer::new(move||{
        App::new()
            .app_data(counter.clone())
            .route("/",web::get().to(index))
    })
    .bind("127.0.0.1:8080")?
    .run()
    .await
}
여기까지 기본이고 , 공식문서에는 추가적인 기능이 상당히 많이 적혀있다.
하지만 내가 원하는 기능을 구현할때 어떤것 까지 해야하는지 알 수 없는 상태에서 너무 어려운 부분을 공부하기보다는 필요할 때 다시 찾아보는게 나을 것 같다는 생각이 들었다.
좀 이른감이 있지만 바로 react 예제로 넘어간다.
728x90