Rust로 웹 애플리케이션 만들기
Actix Web이 최근 Rust에서 뜨는 프레임워크인데요.
기존 Rocket 보다 훨씬 빠르고 가볍다고 합니다.
그래서 Actix로 선택했습니다.
먼저, 빈 Rust 프로그램을 만듭니다.
cargo new rust-fly-test
cd rust-fly-test
cargo add actix-web
아래와 같이 actix-web을 설치가 정상적으로 되면 됩니다.
Updating crates.io index
      Adding actix-web v4.4.0 to dependencies.
             Features:
             + __compress
             + actix-macros
             + actix-web-codegen
             + compress-brotli
             + compress-gzip
             + compress-zstd
             + cookie
             + cookies
             + http2
             + macros
             - actix-tls
             - experimental-io-uring
             - openssl
             - rustls
             - rustls-0_20
             - rustls-0_21
             - secure-cookies
    Updating crates.io index
이제 가장 기본적인 Actix 웹 서버를 만들 건대요.
Actix 홈페이지에 있는 Tutorial을 그대로 베낀 겁니다.
일단 오늘의 목표는 Fly.io 서버에 Deploy해서 원격 서버에서 제대로 작동되는지만 테스트해 보는 게 목적이거든요.
저는 항상 실제 Deploy 해보고 앱 진행을 합니다.
개발 서버에서만 작동하는 앱은 의미가 없고, 그래서 저는 제가 만든 앱이 모든 인터넷에서 작동하는지 꼭 체크하고 앱 개발을 진행해 나갑니다.
그러면, src 폴더의 main.rs 파일을 열어서 아래와 같이 바꿔 줍니다.
use actix_web::{get, post, web, App, HttpResponse, HttpServer, Responder};

#[get("/")]
async fn hello() -> impl Responder {
    HttpResponse::Ok().body("Hello world!")
}

#[post("/echo")]
async fn echo(req_body: String) -> impl Responder {
    HttpResponse::Ok().body(req_body)
}

async fn manual_hello() -> impl Responder {
    HttpResponse::Ok().body("Hey there!")
}

#[get("/healthcheck")]
async fn healthcheck() -> impl Responder {
    HttpResponse::Ok().body("Health Check Completed!")
}

#[actix_web::main]
async fn main() -> std::io::Result<()> {
    println!("Rust Actix-web server started at 127.0.0.1:8080");

    HttpServer::new(|| {
        App::new()
            .service(hello)
            .service(echo)
            .service(healthcheck)
            .route("/hey", web::get().to(manual_hello))
    })
    .bind(("127.0.0.1", 8080))?
    .run()
    .await
}
일단 여러 가지를 만들었습니다.
테스트를 위해 cargo run을 실행해 볼까요?
➜  rust-fly-test git:(master) ✗ cargo run


   Compiling actix-server v2.3.0
   Compiling actix-macros v0.2.4
   Compiling actix-web-codegen v4.2.2
   Compiling zstd v0.12.4
   Compiling actix-http v3.4.0
   Compiling actix-web v4.4.0
   Compiling rust-fly-test v0.1.0 (/Users/cpro95/Codings/Rust/imsi/rust-fly-test)
    Finished dev [unoptimized + debuginfo] target(s) in 1m 41s
     Running `target/debug/rust-fly-test`
Rust Actix-web server started at 127.0.0.1:8080
위와 같이 처음 컴파일하는 거라 상당히 긴 시간이 걸립니다.
그리고 println! 문으로 작성한 문구가 보이면서 서버가 시작되었다고 합니다.
이제 테스트해 볼까요?
➜  rust-fly-test git:(master) ✗ curl http://127.0.0.1:8080
Hello world!%
➜  rust-fly-test git:(master) ✗ curl http://127.0.0.1:8080/hey
Hey there!%
➜  rust-fly-test git:(master) ✗ curl http://127.0.0.1:8080/healthcheck
Health Check Completed!%
➜  rust-fly-test git:(master) ✗ curl http://127.0.0.1:8080/echo -X POST -d "data"
data%
➜  rust-fly-test git:(master) ✗ curl http://127.0.0.1:8080/echo -X POST -d "{"id":"1", "name":"cpro95"}"
{id:1, name:cpro95}%
➜  rust-fly-test git:(master) ✗
위와 같이 커맨드 라인상에서 curl 명령어를 이용해서 작업한 request가 제대로 작동하고 있습니다.
심지어, POST 메서드에서 데이터를 JSON을 전달해도 정상 작동됩니다.
이제 Fly.io에 배포하기 위한 준비는 끝났습니다.
Fly.io에 배포하기
➜  rust-fly-test git:(master) ✗ flyctl auth login
Opening https://fly.io/app/auth/cli/c5886b873cd561dc35f147ff0211775d ...

Waiting for session... Done
successfully logged in as cpro95@gmail.com
먼저, flyctl 명령어를 이용해서 커맨드 라인상에서 login을 합시다.
그러면 웹페이지가 뜨면서 로그인하라고 합니다.
로그인하시면 다시 터미널에 로그인됐다고 나옵니다.
이제 fly launch 명령어를 입력해서 fly 앱 설정을 시작합니다.
➜  rust-fly-test git:(master) ✗ fly launch
Creating app in /Users/cpro95/Codings/Rust/rust-fly-test
Scanning source code
Could not find a Dockerfile, nor detect a runtime or framework from source code. Continuing with a blank app.
? Choose an app name (leave blank to generate one):rust-web-app-tutorial
위와 같이 앱 이름을 넣으면 아래와 같이 서버 위치를 정하라고 나오는데요.
Fly.io는 아쉽게도 Seoul이 없습니다.
가장 가까운 Tokyo를 선택하면 그나마 빠릅니다.
automatically selected personal organization: cpro95
Some regions require a paid plan (bom, fra, maa).
See https://fly.io/plans to set up a plan.

? Choose a region for deployment:  [Use arrows to move, type to filter]
  Hong Kong, Hong Kong (hkg)
  Ashburn, Virginia (US) (iad)
  Johannesburg, South Africa (jnb)
  Los Angeles, California (US) (lax)
  London, United Kingdom (lhr)
  Madrid, Spain (mad)
  Miami, Florida (US) (mia)
> Tokyo, Japan (nrt)
  Chicago, Illinois (US) (ord)
  Bucharest, Romania (otp)
  Phoenix, Arizona (US) (phx)
  Querétaro, Mexico (qro)
  Santiago, Chile (scl)
  Seattle, Washington (US) (sea)
  Singapore, Singapore (sin)

  App will use 'nrt' region as primary

Created app 'rust-fly-test1' in organization 'personal'
Admin URL: https://fly.io/apps/rust-web-app-tutorial
Hostname: rust-web-app-tutorial.fly.dev
? Create .dockerignore from 1 .gitignore files? (y/N) y
Created /Users/cpro95/Codings/Rust/rust-fly-test/.dockerignore from 1 .gitignore files.
Wrote config file fly.toml
위와 같이 Hostname도 지정해서 줍니다.
앱 이름이 Hostname이기 때문에 기존에 누군가 사용하는 앱 이름과 겹치지 않도록 잘 선택하시면 됩니다.
마지막으로 .dockerignore 관련해서 물어보면 y라고 입력하면 됩니다.
그러면, 생기는 파일이 fly.toml 파일인데요.
app = "rust-web-app-tutorial"
primary_region = "nrt"

[http_service]
  internal_port = 8080
  force_https = true
  auto_stop_machines = true
  auto_start_machines = true
  min_machines_running = 0
  processes = ["app"]
primary_region에서 "nrt"가 tokyo를 뜻합니다.
그리고 내부 포트가 8080이라고 지정했네요.
fly.toml에서 http_service 부분이 가장 중요한데요.
Fly 가상 머신이 V2로 오면서 자동으로 http, https 포트에 대응해 줍니다.
http는 80으로 https는 443 포트로 매칭시켜 줍니다.
즉, 가상머신 내부적으로 Rust 웹 앱은 8080으로 작동하지만, 외부적으로는 http 80 포트, https 443 포트로 매칭시켜 줍니다.
그 명령어가 바로 http_service 설정입니다.
일단 healthcheck을 위해 아래와 같은 http_service.checks 부분을 추가합시다.
[[http_service.checks]]
  grace_period = "10s"
  interval = "30s"
  method = "GET"
  timeout = "5s"
  path = "/healthcheck"
이 서비스는 주기적으로 사이트에 접속해서 정상 작동하는지 체크하는 건데요.
그래서 앱이 잠들지 않게 됩니다.
Dockerfile 만들기
이제, fly.toml 파일을 완성했으니 Dockerfile을 만들겠습니다.
Fly.io는 deploy하면 Docker를 만들어서 실행하게 됩니다.
루트 폴더에 Dockerfile이라는 이름으로 아래와 같이 작성합니다.
FROM rust:latest as builder

WORKDIR /usr/src/app
COPY . .

# Will build and cache the binary and dependent crates in release mode
RUN --mount=type=cache,target=/usr/local/cargo,from=rust:latest,source=/usr/local/cargo \
    --mount=type=cache,target=target \
    cargo build --release && mv ./target/release/rust-fly-test ./rust-fly-test

# Runtime image
FROM ubuntu:22.04

# Run as "app" user
RUN useradd -ms /bin/bash app

USER app
WORKDIR /app

# Get compiled binaries from builder's cargo install directory
COPY --from=builder /usr/src/app/rust-fly-test /app/rust-fly-test

# Run the app
CMD ./rust-fly-test
보통 도커 이미지는 debian bullseye를 많이 쓰는데요.
debian bullseye로는 actix 최신버전이랑 rust 최신버전에서 GLIBC 버전이 맞지 않아 계속 에러가 나더라고요.
그래서 ubuntu:22.04 버전을 넣은 겁니다.
Dockerfile을 잘 보시면 cargo로 빌드했을 때 실행파일을 루트로 이동하는 명령어가 있습니다.
그리고 최종적으로 그 파일을 실행하는 건데요.
➜  rust-fly-test git:(master) ✗ fly deploy
==> Verifying app config
Validating /Users/cpro95/Codings/Rust/rust-fly-test/fly.toml
Platform: machines
✓ Configuration is valid
--> Verified app config
==> Building image
Remote builder fly-builder-snowy-sun-1195 ready
==> Building image with Docker
--> docker host: 20.10.12 linux x86_64
[+] Building 10.7s (15/15) FINISHED
 => [internal] load build definition from Dockerfile                                              1.0s
 => => transferring dockerfile: 651B                                                              1.0s
 => [internal] load .dockerignore                                                                 1.0s
 => => transferring context: 94B                                                                  1.0s
 => [internal] load metadata for docker.io/library/rust:latest                                    0.5s
 => [internal] load metadata for docker.io/library/ubuntu:22.04                                   0.6s
 => [internal] load build context                                                                 0.8s
 => => transferring context: 33.67kB                                                              0.7s
 => FROM docker.io/library/rust:latest                                                            0.2s
 => => resolve docker.io/library/rust:latest                                                      0.2s
 => CACHED [builder 1/4] FROM docker.io/library/rust:latest@sha256:94530b7512eddf3207e50801c1ecb  0.0s
 => [stage-1 1/4] FROM docker.io/library/ubuntu:22.04@sha256:aabed3296a3d45cede1dc866a24476c4d7e  0.0s
 => CACHED [builder 2/4] WORKDIR /usr/src/app                                                     0.0s
 => [builder 3/4] COPY . .                                                                        0.0s
 => [builder 4/4] RUN --mount=type=cache,target=/usr/local/cargo,from=rust:latest,source=/usr/lo  8.5s
 => CACHED [stage-1 2/4] RUN useradd -ms /bin/bash app                                            0.0s
 => CACHED [stage-1 3/4] WORKDIR /app                                                             0.0s
 => [stage-1 4/4] COPY --from=builder /usr/src/app/rust-fly-test /app/rust-fly-test               0.1s
 => exporting to image                                                                            0.1s
 => => exporting layers                                                                           0.1s
 => => writing image sha256:28dffd3b2f5bf993b6cb677e392c0dfb2e0c9c258c201ed6ee252996a6772fcc      0.0s
 => => naming to registry.fly.io/rust-web-app-tutorial:deployment-01H9FE9WM2CMKKGRSXB1D8CBR8      0.0s
--> Building image done
...
...
...
...

No machines in group app, launching a new machine
  [1/1] Waiting for 6e82775c243987 [app] to become healthy: 0/1
위와 같이 나오는데요.
마지막에 healthy 부분에서 진행이 안 됩니다.
실제, fly.io 대시보드로 가서 Monitoring 부분에 보면 아래와 같이 나오는데요.
2023-09-04T06:33:33.875 app[6e82775c243987] nrt [info] Rust Actix-web server started at 127.0.0.1:8080

2023-09-04T06:33:57.570 health[6e82775c243987] nrt [error] Health check on port 8080 has failed. Your app is not responding properly. Services exposed on ports [80, 443] will have intermittent failures until the health check passes.
이에 실제 앱의 로그 내용인데요.
로그 내용을 잘 보시면 Actix-web이 127.0.0.1:8080으로 시작했다고 분명히 나옵니다.
이 문구가 출력되는 걸로 봐서 우리가 만든 Rust 프로그램이 컴파일이 제대로 됐고, 실행도 됐다는 얘기인데요.
마지막 문구를 보시면 Health check이 에러가 납니다.
왜 그런 걸까요?
저도 이걸로 고생했는데요.
우리가 Rust main.rs에서 주소를 127.0.0.1:8080으로 줬었는데요.
이건 개발 서버를 돌릴 때 주는 주소입니다.
실제 배포할 때는 특히, fly.io에서는 0.0.0.0:8080이라는 주소를 줘야 합니다.
다시 main.rs 파일을 아래와 같이 바꾸고 다시 fly deploy 해보겠습니다.
#[actix_web::main]
async fn main() -> std::io::Result<()> {
    println!("Rust Actix-web server started at 127.0.0.1:8080");

    HttpServer::new(|| {
        App::new()
            .service(hello)
            .service(echo)
            .service(healthcheck)
            .route("/hey", web::get().to(manual_hello))
    })
    // .bind(("127.0.0.1", 8080))?
    .bind(("0.0.0.0", 8080))?
    .run()
    .await
}
이제 다시 fly deploy 해보겠습니다.
아까 만들었던 Docker 이미지라서 금발 끝날 겁니다.
--> Pushing image done
image: registry.fly.io/rust-web-app-tutorial:deployment-01H9FEPA8SMVGFMY73PW583SVP
image size: 90 MB

Watch your deployment at https://fly.io/apps/rust-web-app-tutorial/monitoring

Updating existing machines in 'rust-web-app-tutorial' with rolling strategy
  [1/1] Machine 6e82775c243987 [app] update finished: success
  Finished deploying

Visit your newly deployed app at https://rust-web-app-tutorial.fly.dev/
위와 같이 success 라고 나오네요.
다시 아래와 같이 fly.io 대시보드에서도 Health check이 passing이라고 나옵니다.
2023-09-04T06:40:12.619 app[6e82775c243987] nrt [info] Rust Actix-web server started at 127.0.0.1:8080

2023-09-04T06:40:41.718 health[6e82775c243987] nrt [info] Health check on port 8080 is now passing.
실제 주소에서 테스트해 보기
이제 우리의 Rust 웹 앱이 서버에 배포가 완료되었습니다.
테스트만 남았는데요.
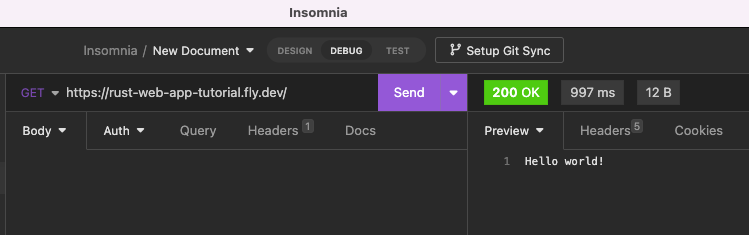

위 그림을 보시면 GET, POST 메서드 모두 정상 작동합니다.
그리고 실제 Fly.io 대시보드에 가서 앱의 메모리 사용량을 볼까요?
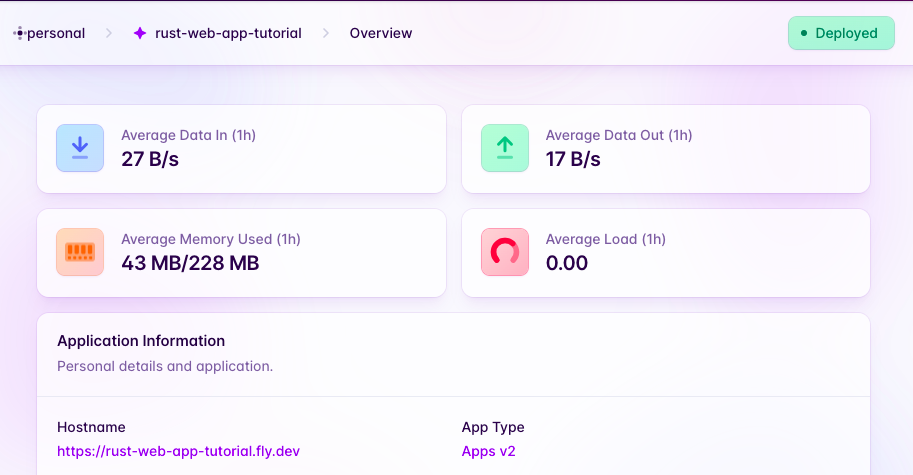
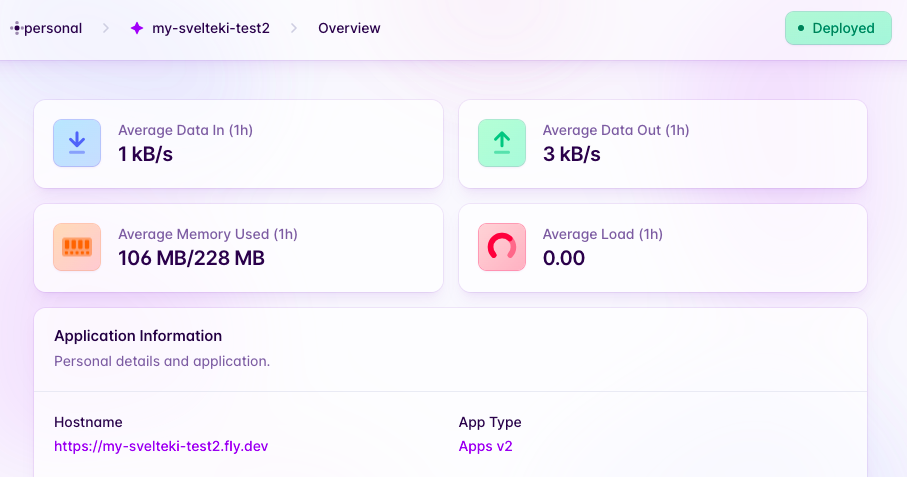
Rust 앱이 43MB이고 예전에 SvelteKit으로 만든 앱이 106MB입니다.
확실히 Rust가 가볍고 빠르네요.
그럼, 다음 시간에는 본격적인 Rust 웹 서버 개발에 들어가 보도록 하겠습니다.
Rust 웹 서버 만들기 2편. Rust에서 Reqwest를 이용해서 HTTP 요청(Request)하기
출처: https://mycodings.fly.dev/blog/2023-09-04-how-to-use-rust-reqwest-http-get-post
지난 시간에 이어 Rust로 웹 서버 만들기 강좌를 계속 이어 나가겠습니다.
Rust 웹 서버 만들기 1편. Actix Web 그리고 Fly.io에 배포하기
우리가 NodeJS로 웹 애플리케이션을 만들 때 가장 많이 이용하는 게 바로 fetch 함수인데요.
axios, request 등 HTTP 요청을 쉽게 해주는 여러 가지 패키지가 존재합니다.
Rust에서는 Reqwest가 아주 유명한데요.
이거 하나만 익혀도 되니 다른 건 안 찾아보셔도 됩니다.
테스트를 위해서 빈 폴더에 다음과 같이 앱을 하나 만듭니다.
cargo new reqwest-test

cd reqwest-test

cargo add reqwest --features json
cargo add tokio --features full
비동기식에 있어 tokio는 필수 패키지죠.
이제, 본격적인 reqwest(리퀘스트)를 해볼까요?
GET 요청
#[tokio::main]
async fn main() {
    let response = reqwest
        ::get("https://jsonplaceholder.typicode.com/users").await;
    println!("{:?}", response);
}
우리가 사용할 테스트 서버는 jsonplaceholder 입니다.
HTTP GET 요청은 reqwest::get(url) 방식으로 하고,
await를 이용해서 비동기식으로 작동시키면 됩니다.
➜  reqwest-test git:(master) ✗ cargo run
   Compiling reqwest-test v0.1.0 (/Users/cpro95/Codings/Rust/reqwest-test)
    Finished dev [unoptimized + debuginfo] target(s) in 2.01s
     Running `target/debug/reqwest-test`
Ok(Response { url: Url { scheme: "https", cannot_be_a_base: false, username: "", password: None, host: Some(Domain("jsonplaceholder.typicode.com")), port: None, path: "/users", query: None, fragment: None }, status: 200, headers: {"date": "Mon, 04 Sep 2023 13:16:15 GMT", "content-type": "application/json; charset=utf-8", "transfer-encoding": "chunked", "connection": "keep-alive", "x-powered-by": "Express",cldPwVWkvxTa03X3zwofv66zbL88VMiAMa0%2F7%2BUU6msXke5ntw\"}],\"group\":\"cf-nel\",\"max_age\":604800}", "nel": "{\"success_fraction\":0,\"report_to\":\"cf-nel\",\"max_age\":604800}", "server": "cloudflare", "cf-ray": "801681834df019c2-KIX", "alt-svc": "h3=\":443\"; ma=86400"} })
➜  reqwest-test git:(master) ✗
실행결과는 조금 이상한데요.
다른 언어에서 Rust로 넘어오셔서 Result를 처음 접하시면 헷갈립니다.
저도 지금 매우 헷갈리는데요.
일단 Visual Studio Code에서 reqwest::get 위치에 마우스를 갖다 대면 아래와 같이 나옵니다.
reqwest
pub async fn get<T>(url: T) -> crate::Result<Response>
where
    T: IntoUrl,
즉, 리턴 값이 Result에 Response가 있다는 뜻입니다.
즉, 위 코드는 Result의 Response를 보여주게 됩니다.
그럼, 우리가 원하는 데이터는 어떻게 보죠.
바로 Result를 match 시켜서 분해하는 방법이 있는데요.
더 쉽게 unwrap() 메서드를 쓰면 됩니다.
코드를 다시 바꿔 볼까요?
#[tokio::main]
async fn main() {
    let response = reqwest::get("https://jsonplaceholder.typicode.com/users")
        .await
        .unwrap()
        .text()
        .await;
    println!("{:?}", response);
}
reqwest::get() 다음에 await 하고 나서 unwrap() 했습니다.
unwrap()은 Result를 그냥 에러 상관없이 풀어버리라고 하는 명령어입니다.
그리고 우리가 보기 쉽게 text()로 바꾸는 명령어를 주었습니다.
text() 명령어도 비동기식이라 최종적으로 await를 한번 더 줬습니다.
이제 결과를 볼까요?
➜  reqwest-test git:(master) ✗ cargo run
   Compiling reqwest-test v0.1.0 (/Users/cpro95/Codings/Rust/reqwest-test)
    Finished dev [unoptimized + debuginfo] target(s) in 1.91s
     Running `target/debug/reqwest-test`
Ok("[\n  {\n    \"id\": 1,\n    \"name\": \"Leanne Graham\",\n \"bs\": \"target end-to-end models\"\n    }\n  }\n]")
➜  reqwest-test git:(master) ✗
최종적으로 OK() 안에 우리가 원하는 데이터가 있네요.
reqwest::get의 statusCode에 따른 match 구문 작성하기
이제, 코드를 바꿔서 match 구문을 활용해 볼까요?
#[tokio::main]
async fn main() {
    let response = reqwest::get("https://jsonplaceholder.typicode.com/users").await;

    match response {
        Ok(body) => {
            let data = body.text().await;
            println!("{:?}", data);
        }
        Err(err) => {
            eprintln!("{:?}", err);
        }
    }
}
이 방식으로도 써도 되고요.
아래와 같은 방식으로도 써도 됩니다.
#[tokio::main]
async fn main() {
    let response = reqwest::get("https://jsonplaceholder.typicode.com/users")
        .await
        .unwrap();

    match response.status() {
        reqwest::StatusCode::OK => {
            // parse our response
            match response.text().await {
                Ok(parsed) => println!("parsed {:?}", parsed),
                Err(_) => println!("error"),
            };
        }
        reqwest::StatusCode::UNAUTHORIZED => {
            println!("unauthorized");
        }

        other => {
            panic!("panic!!, {:?}", other);
        }
    }
}
response를 딱 unwrap()까지만 했습니다.
그리고 response의 status() 메서드를 이용했고요.
실행 결과는 똑같을 겁니다.
TMDB_API_KEY 키를 활용한 Reqwest GET 요청하기
제가 예전에 만든 myMovies 앱이 있는데요.
TMDB에서 popular movies를 불러와서 브라우저에 뿌려주는 앱을 만들었습니다.
오늘은 여기서 사용한 TMDB_API_KEY를 활용해서 Reqwest GET 요청을 해볼까 합니다.
NodeJS에서 .env 파일을 쓰는데요.
Rust에서도 .env 파일을 쓸 수 있습니다.
일단 다음과 같이 dotenv 패키지를 설치합시다.
cargo add dotenv
dotenv 패키지는 아래와 같이 사용하시면 됩니다.
use dotenv::dotenv;

fn main() {
    dotenv().ok();

    for (key, value) in std::env::vars() {
        println!("{}: {}", key, value);
    }

    println!("{}", std::env::var("TMDB_API_KEY").unwrap());
}
실행 결과는 현재 터미널의 환경변수를 전부 보여주고요.
그다음에 .env에 있는 TMDB_API_KEY를 출력해 줍니다.
Reqwest를 이용해서 TMDB 영화 불러오기
이제 우리가 위에서 배운 Get 메서드를 좀 더 확장해 볼까요?
use dotenv::dotenv;

#[tokio::main]
async fn main() {
    dotenv().ok();

    let tmdb_url = format!(
        "https://api.themoviedb.org/3/movie/popular?api_key={}&page=1",
        std::env::var("TMDB_API_KEY").unwrap()
    );
    let client = reqwest::Client::new();

    let response = client
        .get(tmdb_url)
        .header(reqwest::header::CONTENT_TYPE, "application/json")
        .header(reqwest::header::ACCEPT, "application/json")
        .send()
        .await
        .unwrap();

    match response.status() {
        reqwest::StatusCode::OK => {
            // parse our response
            match response.text().await {
                Ok(parsed) => println!("parsed {:?}", parsed),
                Err(_) => println!("error"),
            };
        }
        reqwest::StatusCode::UNAUTHORIZED => {
            println!("unauthorized");
        }

        other => {
            panic!("panic!!, {:?}", other);
        }
    }
}
위 코드에서 어려운 거는 없는데요.
일단 reqwest::get으로 GET 요청을 한 게 아니라 reqwest Client 객체를 하나 만들고 그 객체에다가 여러 가지 header를 추가하고 요청을 수행했습니다.
header를 추가한 걸로 봐서 POST 요청할 때 token을 bearer 방식으로 넣는 것도 가능하겠네요.
let client = reqwest::Client::new();
let response = client
    .get(url)
    .header(AUTHORIZATION, "Bearer [AUTH_TOKEN]")
    .header(CONTENT_TYPE, "application/json")
    .header(ACCEPT, "application/json")
    .send()
    .await
    .unwrap();
println!("Success! {:?}", response)
token을 넣는 방식은 위와 같이 header를 하나 추가하면 됩니다.
이제, 실행 결과를 볼까요?
➜  reqwest-test git:(master) ✗ cargo run
   Compiling reqwest-test v0.1.0 (/Users/cpro95/Codings/Rust/reqwest-test)
    Finished dev [unoptimized + debuginfo] target(s) in 2.00s
     Running `target/debug/reqwest-test`
parsed "{\"page\":1,\"results\":[{\"adult\":false,\"backdrop_path\":\"/8pjWz2lt29KyVGoq1mXYu6Br7dE.jpg\",\"genre_ids\":[28,878,27],the Galaxy Vol. 3\",\"video\":false,\"vote_average\":8,\"vote_count\":4638}],\"total_pages\":39861,\"total_results\":797216}"
➜  reqwest-test git:(master) ✗
parsed 값이 너무 많이 제가 조금 줄여서 보여드린 겁니다.
Reqwest Client를 이용해서 타임아웃이 있는 요청을 지속적으로 해보기
우리가 요청을 할 때 한번 할 수도 있는데요.
보통 될 때까지 연결하라고 명령을 줄 필요가 있습니다.
이 부분을 작성해 볼까 하는데요.
use dotenv::dotenv;

async fn send_request_with_retry(url: &str) -> Result<String, reqwest::Error> {
    let mut retry_count = 0;
    let max_retries = 5;
    let client = reqwest::Client::builder()
        .timeout(std::time::Duration::from_secs(10))
        .build()?;

    loop {
        let response = client
            .get(url)
            .header(reqwest::header::CONTENT_TYPE, "application/json")
            .header(reqwest::header::ACCEPT, "application/json")
            .send()
            .await?;

        if response.status().is_success() {
            return Ok(response.text().await?);
        } else if retry_count < max_retries {
            retry_count += 1;
            eprintln!("Request failed, attempt {} of {}", retry_count, max_retries);
        } else {
            break Ok("timeout".to_string());
        }
    }
}

#[tokio::main]
async fn main() {
    dotenv().ok();

    let tmdb_url = format!(
        "https://api.themoviedb.org/3/movie/popular?api_key={}&page=1",
        std::env::var("TMDB_API_KEY").unwrap()
    );
    match send_request_with_retry(&tmdb_url).await {
        Ok(body) => {
            println!("{}", body);
        }
        Err(err) => {
            eprintln!("Failed to fetch data: {}", err);
        }
    }
}
여기서는 send_request_with_retry 함수를 잘 봐야 하는데요.
이 함수에서는 Reqwest::Client의 Builder를 이용해서 timeout을 줬습니다.
timeout 10초를 줬는데요.
만약 10초 후에는 어떻게 될까요?
더 이상 연결 안 하겠죠?
그래서 저는 max_retries와 retry_count 변수를 활용해서 loop를 돌렸습니다.
5번 시도했는데 결과가 없다면 "timeout" 문자열을 리턴하게끔 만들었습니다.
이걸 테스트하기 위해 tmdb 서버의 주소를 약간 바꿔서 일부러 에러가 나게끔 해보겠습니다.
https://api.themoviedb.org/0/movie/
위에서처럼 3이란 숫자를 0으로 바꿨는데요.
이거는 TMDB API 서버의 버전입니다.
현재는 버전 3이란 뜻이죠.
버전 0으로 바꾸고 테스트해 볼까요?
➜  reqwest-test git:(master) ✗ cargo run
   Compiling reqwest-test v0.1.0 (/Users/cpro95/Codings/Rust/reqwest-test)
    Finished dev [unoptimized + debuginfo] target(s) in 1.83s
     Running `target/debug/reqwest-test`
Request failed, attempt 1 of 5
Request failed, attempt 2 of 5
Request failed, attempt 3 of 5
Request failed, attempt 4 of 5
Request failed, attempt 5 of 5
timeout
➜  reqwest-test git:(master) ✗
강제로 에러가 나오게끔 했더니 위와 같이 5번 시도했고, 최종적으로 timeout 문구를 리턴 했습니다.
앞으로 제가 만들 웹 서버에서는 이 함수를 사용할 예정입니다.
왜냐하면 기존 사이트를 미러링하는 서버이기 때문에 될 때까지 시도해야 하거든요.
Reqwest POST 요청하기
이제 POST 요청으로 넘어가 보겠습니다.
#[tokio::main]
async fn main() {
    let url = "https://rust-web-app-tutorial.fly.dev/echo";
    let json_data = r#"
        {"id":"1", "name":"brian"}
    "#;

    let client = reqwest::Client::new();

    let response = client
        .post(url)
        .header("Content-Type", "application/json")
        .body(json_data.to_owned())
        .send()
        .await;

    let response_body = response.unwrap().text().await;
    println!("{:?}", response_body);
}
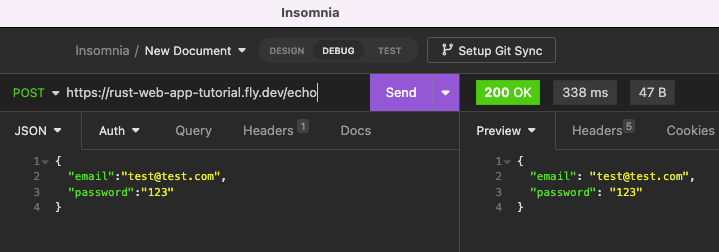
POST 요청을 위해 지난 시간에 만든 Rust 웹 서버의 echo route를 이용했습니다.
실행 결과를 볼까요?
➜  reqwest-test git:(master) ✗ cargo run
   Compiling reqwest-test v0.1.0 (/Users/cpro95/Codings/Rust/reqwest-test)
    Finished dev [unoptimized + debuginfo] target(s) in 1.59s
     Running `target/debug/reqwest-test`
Ok("\n        {\"id\":\"1\", \"name\":\"brian\"}\n    ")
➜  reqwest-test git:(master) ✗
아주 잘 작동하고 있네요.
이제 POST까지 배웠으니까, PUT, DELETE도 직접 Doc.rs 사이트에서 찾아보고 도전해 보시기 바랍니다.
그럼.
Rust 웹 서버 만들기 3편. scraper를 이용해서 러스트로 웹 스크래핑하기
출처: https://mycodings.fly.dev/blog/2023-09-07-rust-web-server-how-to-use-scraper
지난 시간에 이어 다시 Rust로 웹 서버 만들기 강좌를 이어 나가도록 하겠습니다.
지난 시간까지의 글 목록입니다.
Rust 웹 서버 만들기 1편. Actix Web 그리고 Fly.io에 배포하기
Rust 웹 서버 만들기 2편. Rust에서 Reqwest를 이용해서 HTTP 요청(Request)하기
지난 시간에는 reqwest로 HTTP 요청하는 방법에 대해 알아봤는데요,
오늘은 HTTP 요청으로 얻은 데이터를 가공하는 방법에 대해 알아보겠습니다.
보통 이런 걸 웹 스크래핑이라고 하는데요.
NodeJS 진영에서는 Puppeteer가 아주 유명합니다.
파이선 진영에서는 Playwright가 유명하고요.
우리는 러스트 언어에서 구현해야 하므로 러스트 언어에는 웹 스크래핑 라이브러리가 없나 검색하던중 구글에서 바로 Scraper를 추천해 줬습니다.
오늘은 이 Scraper로 웹 스크래핑하는 방법에 주안점을 두고 글을 써 나가겠습니다.
웹 스크래핑하고자 하는 목표 설정
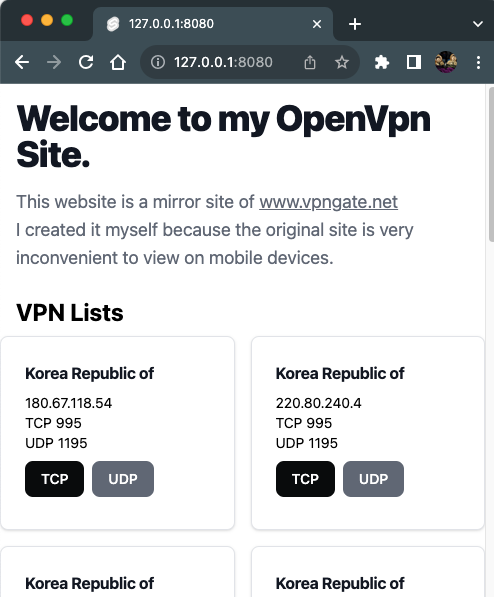
제가 만든 사이트가 myopenvpn.fly.dev 사이트인데요.
이 사이트는 vpngate.net 사이트에서 openvpn 설정 파일을 손쉽게 구현하고자 제가 만들었던 사이트인데요.
불필요한 정보는 과감히 삭제해서 간략화했으며,
또한, 모바일에서도 잘 볼 수 있게 반응형 UI로 만들었습니다.
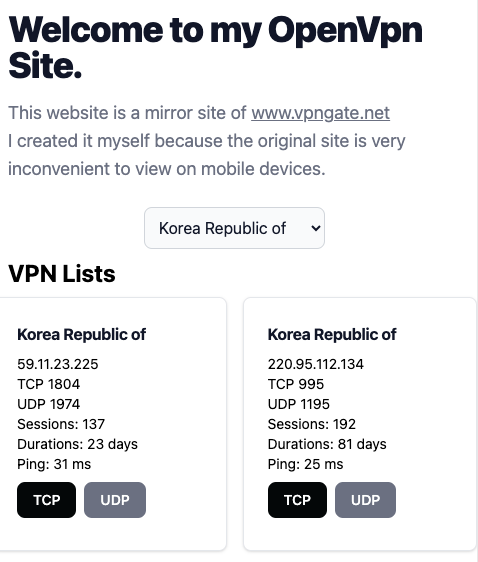
위 그림이 최종 버전입니다.
그러면 vpngate.net의 어떤 정보를 받아와야 할까요?

바로 위와 같이 한국 서버의 openvpn config file 링크인데요.
이 링크는 아래와 같은 형식으로 되어 있습니다.
이 주소의 URL을 파싱해서 ip, tcp, udp, sid, hid 정보를 얻어와야 합니다.
그러면 실제로 이 정보를 이용해서 직접 다운받는 링크를 만들 수 있습니다.
다운받는 URL 주소를 볼까요?
제가 테스트해 본 결과, ip, tcp, udp, sid, hid 값만 있으면 바로 위와 같이 만들 수 있습니다.
그래서 우리의 최종목표는 이 주소에서 데이터를 추출하는 게 목적인데요.
그러면 이 데이터가 위치한 곳을 찾아야 하는데요.
가만히 보시면 table입니다.
크롬에서 검사를 눌러 실제 html 파일을 보면 다음과 같은 id를 이용하는 걸 볼 수 있습니다.

id는 바로 "vg_hosts_table_id"입니다.
이걸 이용해서 scraper를 이용해 봅시다.
먼저, Cargo.toml파일에 설치할 패키지를 설정하겠습니다.
[dependencies]
actix-web = "4.4"
reqwest = "0.11"
tokio = { version = "1", features = ["full"] }
scraper = "0.17"
url = "2.4"
serde = { version = "1", features = ["derive"] }
serde_json = "1"
env_logger = "0.10.0"
테스트를 위한 코드 구축
저는 println! 문을 이용해서 단계별로 내가 짠 코드를 테스트하길 원하거든요.
그래야 안심이 됩니다.
일단 완성품을 작성하기 전에 컴파일되면서 데이터를 출력할 수 있게 임시로 main.rs 파일을 만들겠습니다.
mod my_scrape_lib;
use my_scrape_lib::scrape_vpn_info;

use actix_web::{ get, App, HttpResponse, HttpServer, Responder };

#[get("/")]
async fn get_vpn_info() -> impl Responder {
    let vpn_info_result = scrape_vpn_info().await;

    match vpn_info_result {
        Ok(vpn_info_vec) => { HttpResponse::Ok().body("Hello world!") }
        Err(err) => {
            eprint!("Error: {}", err);
            HttpResponse::InternalServerError().body(format!("Error: {}", err))
        }
    }
}

#[get("/healthcheck")]
async fn healthcheck() -> impl Responder {
    HttpResponse::Ok().body("Health Check Completed!")
}

#[actix_web::main]
async fn main() -> std::io::Result<()> {
    println!("Rust Actix-web server started at 127.0.0.1:8080");

    HttpServer::new(|| {
        App::new()
            .service(get_vpn_info)
            .service(healthcheck)
    })
        .bind(("127.0.0.1", 8080))?
        // .bind(("0.0.0.0", 8080))?
        .run().await
}
get_vpn_info 함수를 서버의 루트 인덱스로 사용했으며,
get_vpn_info 함수는 scrape_vpn_info 함수를 실행하는 역할만 합니다.
나중에 최종본이 완성되면 scrape_vpn_info 함수에서 얻은 벡터 정보를 JSON 형태로 브라우저에 전달하는 API를 만들 예정입니다.
일단 scrape_vpn_info 함수가 있는 my_scrape_lib 모듈을 만들어야 하는데요.
my_scrape_lib.rs 파일을 만들어도 되고, my_scrape_lib 폴더에 그리고 그 안에 mod.rs 파일을 만들어도 됩니다.
러스트에서는 파일, 폴더를 모두 모듈로 인식하기 때문입니다.
저는 my_scrape_lib 폴더에 mod.rs 파일을 만들었는데요.
use serde::{ Deserialize, Serialize };

#[derive(Serialize, Deserialize, Debug)]
pub struct VpnInfo {
    country: String,
    ip: String,
    tcp: String,
    udp: String,
    sid: String,
    hid: String,
}

async fn request_with_retry(url: &str) -> Result<String, reqwest::Error> {
    let client: reqwest::Client = reqwest::Client
        ::builder()
        .timeout(std::time::Duration::from_secs(10))
        .build()?;

    loop {
        let response = client.get(url).send().await?;
        if response.status().is_success() {
            return Ok(response.text().await?);
        }
    }
}

pub async fn scrape_vpn_info() -> Result<Vec<String>, Box<dyn std::error::Error>> {
    match request_with_retry("https://www.vpngate.net/en/").await {
        Ok(body) => {
            let document = scraper::Html::parse_document(&body);
            println!("{:?}", document);

            let my_table_selector = scraper::Selector::parse("#vg_hosts_table_id").unwrap();
            println!("{:?}",my_table_selector);
             }
        Err(err) => {
            eprint!("Failed to fetch data: {}", err);
            return Err(Box::new(err));
        }
    }

    let imsi = Vec::new();
    Ok(imsi)
}
위 코드를 찬찬히 설명해 보자면, 일단 VpnInfo 구조체로 우리가 얻을 자료의 구조체를 정의했습니다.
그리고 request_with_retry 함수를 만들었는데요.
이 함수는 reqwest::get 요청이 성공할 때까지 계속 요청하라는 함수인데요.
왜 이렇게 했냐 하면 제가 만들었던 사이트가 간혹 vpngate.net의 서버 응답이 없으면 전혀 작동하지 않아서, 무조건 vpngate.net의 응답이 올 때까지 기다린 후 작업을 이어 나가도록 했습니다.
이제 핵심 함수인 scrape_vpn_info 함수를 볼까요?
request_with_retry 함수의 리턴타입이 Resutl라서 위와 같이 match와 Ok, Err을 이용해서 뼈대를 구성했습니다.
request_with_retry 함수가 가져오는 값은 전체 HTML 코드인데요.
우리는 이걸 직접 파싱 하기보다는 scraper이란 툴을 이용해서 파싱 할 겁니다.
let document = scraper::Html::parse_document(&body);
위 코드에서 reqwest가 받아온 html을 scraper가 인식할 수 있는 document로 만드는 방법입니다.
그리고 다음 코드가 우리가 찾고자 하는 table의 id를 이용해서 찾는 명령어입니다.
let my_table_selector = scraper::Selector::parse("#vg_hosts_table_id").unwrap();
여기까지 테스트해 볼까요?
이 프로그램은 웹 서버니까요, 브라우저에서 새로고침 한번 하시면 됩니다.
그러면 웹 서버가 vpngate.net에 접속해서 데이터를 가져오고 그걸 화면에 뿌려줄 겁니다.
출력결과는 아래와 같습니다.
너무 많아서 조금 줄였습니다.
 { parent: Some(NodeId(38)), prev_sibling: Some(NodeId(10576)), next_sibling: Some(NodeId(10578)), children: None, value: Text("\n") }, Node { parent: Some(NodeId(38)), prev_sibling: Some(NodeId(10577)), next_sibling: Some(NodeId(10579)), children: None, value: Element(<script async="" src="https://www.googletagmanager.com/gtag/js?id=UA-117138093-1">) }, Node { parent: Some(NodeId(38)), prev_sibling: Some(NodeId(10578)), next_sibling: Some(NodeId(10580)), children: None, value: Text("\n") }, Node { parent: Some(NodeId(38)), prev_sibling: Some(NodeId(10579)), next_sibling: Some(NodeId(10582)), children: Some((NodeId(10581), NodeId(10581))), value: Element(<script>) }, Node { parent: Some(NodeId(10580)), prev_sibling: None, next_sibling: None, children: None, value: Text("\n  window.dataLayer = window.dataLayer || [];\n  function gtag(){dataLayer.push(arguments);}\n  gtag('js', new Date());\n\n  gtag('config', 'UA-117138093-1');\n") }, Node { parent: Some(NodeId(38)), prev_sibling: Some(NodeId(10580)), next_sibling: Some(NodeId(10583)), children: None, value: Text("\n\n") }, Node { parent: Some(NodeId(38)), prev_sibling: Some(NodeId(10582)), next_sibling: Some(NodeId(10585)), children: Some((NodeId(10584), NodeId(10584))), value: Element(<script type="text/javascript">) }, Node { parent: Some(NodeId(10583)), prev_sibling: None, next_sibling: None, children: None, value: Text("\n\n\tvar _gaq = _gaq || [];\n\t_gaq.push(['_setAccount', 'UA-26766422-7']);\n\t_gaq.push(['_trackPageview']);\n\n\t(function () {\n\t\tvar ga = document.createElement('script'); ga.type = 'text/javascript'; ga.async = true;\n\t\tga.src = ('https:' == document.location.protocol ? 'https://ssl' : 'http://www') + '.google-analytics.com/ga.js';\n\t\tvar s = document.getElementsByTagName('script')[0]; s.parentNode.insertBefore(ga, s);\n\t})();\n\n") }, Node { parent: Some(NodeId(38)), prev_sibling: Some(NodeId(10583)), next_sibling: None, children: None, value: Text("\n\n\n\t\t\t") }, Node { parent: Some(NodeId(34)), prev_sibling: Some(NodeId(36)), next_sibling: None, children: None, value: Text("\n\t\t") }, Node { parent: Some(NodeId(32)), prev_sibling: Some(NodeId(34)), next_sibling: None, children: None, value: Text("\n\t") }, Node { parent: Some(NodeId(31)), prev_sibling: Some(NodeId(32)), next_sibling: None, children: None, value: Text("\n") }, Node { parent: Some(NodeId(21)), prev_sibling: Some(NodeId(29)), next_sibling: None, children: None, value: Text("\n") }, Node { parent: Some(NodeId(19)), prev_sibling: Some(NodeId(21)), next_sibling: None, children: None, value: Text("\n\n\n") }] } }
Selector { selectors: [Selector(#vg_hosts_table_id, specificity = 0x100000, flags = SelectorFlags(0x0))] }
마지막에 Selector이 보이는데 이게 my_table_selector이고, 그리고 그 위에 있는 게 document입니다.
html 코드를 scraper가 scraper가 인식하기 편하게 바꾼 겁니다. 즉, 파싱(parsing)했다는 뜻입니다.
이제, 웹 스크래핑 준비가 끝났는데요.
원하는 데이터를 추출하러 가 볼까요?
vg_hosts_table_id의 테이블이 3개가 있습니다.
vpngate.net의 html을 잘 보시면 주요 데이터는 거의 테이블인데요.
vg_hosts_table_id 이름으로 된 게 3개나 됩니다.
그리고 제가 원하는 테이블은 3번째이거든요.
이걸 구현해 보겠습니다.
pub async fn scrape_vpn_info() -> Result<Vec<String>, Box<dyn std::error::Error>> {
    match request_with_retry("https://www.vpngate.net/en/").await {
        Ok(body) => {
            let document = scraper::Html::parse_document(&body);
            // println!("{:?}", document);

            let my_table_selector = scraper::Selector::parse("#vg_hosts_table_id").unwrap();
            // println!("{:?}", my_table_selector);

            let mut table_count = 0;
            for table in document.select(&my_table_selector) {
                table_count += 1;
                if table_count == 3 {
                    println!("{:?}", table);
                }
            }
        }
        Err(err) => {
            eprint!("Failed to fetch data: {}", err);
            return Err(Box::new(err));
        }
    }

    let imsi = Vec::new();
    Ok(imsi)
}
마지막 table만 println! 문구를 이용해서 출력하라고 했습니다.
Some(NodeId(10597)), prev_sibling: None, next_sibling: None, children: None, value: Text("\n\n\tvar _gaq = _gaq || [];\n\t_gaq.push(['_setAccount', 'UA-26766422-7']);\n\t_gaq.push(['_trackPageview']);\n\n\t(function () {\n\t\tvar ga = document.createElement('script'); ga.type = 'text/javascript'; ga.async = true;\n\t\tga.src = ('https:' == document.location.protocol ? 'https://ssl' : 'http://www') + '.google-analytics.com/ga.js';\n\t\tvar s = document.getElementsByTagName('script')[0]; s.parentNode.insertBefore(ga, s);\n\t})();\n\n") }, Node { parent: Some(NodeId(38)), prev_sibling: Some(NodeId(10597)), next_sibling: None, children: None, value: Text("\n\n\n\t\t\t") }, Node { parent: Some(NodeId(34)), prev_sibling: Some(NodeId(36)), next_sibling: None, children: None, value: Text("\n\t\t") }, Node { parent: Some(NodeId(32)), prev_sibling: Some(NodeId(34)), next_sibling: None, children: None, value: Text("\n\t") }, Node { parent: Some(NodeId(31)), prev_sibling: Some(NodeId(32)), next_sibling: None, children: None, value: Text("\n") }, Node { parent: Some(NodeId(21)), prev_sibling: Some(NodeId(29)), next_sibling: None, children: None, value: Text("\n") }, Node { parent: Some(NodeId(19)), prev_sibling: Some(NodeId(21)), next_sibling: None, children: None, value: Text("\n\n\n") }] }, node: Node { parent: Some(NodeId(216)), prev_sibling: Some(NodeId(685)), next_sibling: Some(NodeId(10445)), children: Some((NodeId(689), NodeId(690))), value: Element(<table id="vg_hosts_table_id" cellspacing="0" cellpadding="4" border="1">) } } }
실행결과는 대 성공입니다.
즉, 3번째 table을 골랐다는 뜻인데요.
제가 원하는 데이터는 아래 그림과 같이 한 개의 TR로 구성되어 있습니다.

그리고 TR의 첫 번째 TD에서 이미지 말고 텍스트값이 "Korea Republic of"입니다.
즉, 우리나라의 TR에서 7번째 TD에 있는 a 태그의 href 값을 가져오면 되는 거죠.
pub async fn scrape_vpn_info() -> Result<Vec<String>, Box<dyn std::error::Error>> {
    match request_with_retry("https://www.vpngate.net/en/").await {
        Ok(body) => {
            let document = scraper::Html::parse_document(&body);
            // println!("{:?}", document);

            let my_table_selector = scraper::Selector::parse("#vg_hosts_table_id").unwrap();
            // println!("{:?}", my_table_selector);

            let mut table_count = 0;
            for table in document.select(&my_table_selector) {
                table_count += 1;
                if table_count == 3 {
                    // println!("{:?}", table);
                    let my_tbody_selector = scraper::Selector::parse("tbody").unwrap();
                    if let Some(tbody) = table.select(&my_tbody_selector).next() {
                        let my_tr_selector = scraper::Selector::parse("tr").unwrap();
                        for tr in tbody.select(&my_tr_selector) {
                            let my_td_selector = scraper::Selector::parse("td").unwrap();
                            if let Some(first_td) = tr.select(&my_td_selector).next() {
                                let country_text = first_td.text().collect::<String>();
                                if country_text == "Korea Republic of" {
                                    if let Some(seventh_td) = tr.select(&my_td_selector).nth(6) {
                                        let my_a_selector = scraper::Selector::parse("a").unwrap();
                                        if let Some(a) = seventh_td.select(&my_a_selector).next() {
                                            if let Some(href) = a.value().attr("href") {
                                                println!("{:?}", href);

                                            }
                                        }
                                    }
                                    break;
                                }
                            }
                        }
                    }
                }
            }
        }
        Err(err) => {
            eprint!("Failed to fetch data: {}", err);
            return Err(Box::new(err));
        }
    }

    let imsi = Vec::new();
    Ok(imsi)
}
위 코드에서 break 문구를 이용한 이유는 데이터를 너무 많이 찾지 말고 한 개만 찾으라는 의미입니다.
실행 결과는 아래와 같습니다.
Rust Actix-web server started at 127.0.0.1:8080
"do_openvpn.aspx?fqdn=vpn115620030.opengw.net&ip=211.46.22.50&tcp=1752&udp=1320&sid=1694096944399&hid=19512800"
href 값이 나왔네요.
그러면 여기서 우리가 원하는 ip, tcp, udp, sid, hid 값을 얻으면 됩니다.
위 href 텍스트를 자세히 보면 URL인데요.
URL params 규칙을 따르고 있습니다.
그래서 이걸 앞에 주소를 붙여 정식 URL로 만들고 러스트의 url 라이브러리로 파싱 하면 될 거 같네요.
pub async fn scrape_vpn_info() -> Result<Vec<String>, Box<dyn std::error::Error>> {
    match request_with_retry("https://www.vpngate.net/en/").await {
        Ok(body) => {
            let document = scraper::Html::parse_document(&body);
            // println!("{:?}", document);

            let my_table_selector = scraper::Selector::parse("#vg_hosts_table_id").unwrap();
            // println!("{:?}", my_table_selector);

            let mut table_count = 0;
            for table in document.select(&my_table_selector) {
                table_count += 1;
                if table_count == 3 {
                    // println!("{:?}", table);
                    let my_tbody_selector = scraper::Selector::parse("tbody").unwrap();
                    if let Some(tbody) = table.select(&my_tbody_selector).next() {
                        let my_tr_selector = scraper::Selector::parse("tr").unwrap();
                        for tr in tbody.select(&my_tr_selector) {
                            let my_td_selector = scraper::Selector::parse("td").unwrap();
                            if let Some(first_td) = tr.select(&my_td_selector).next() {
                                let country_text = first_td.text().collect::<String>();
                                if country_text == "Korea Republic of" {
                                    if let Some(seventh_td) = tr.select(&my_td_selector).nth(6) {
                                        let my_a_selector = scraper::Selector::parse("a").unwrap();
                                        if let Some(a) = seventh_td.select(&my_a_selector).next() {
                                            if let Some(href) = a.value().attr("href") {
                                                println!("{:?}", href);
                                                let complete_url =
                                                    format!("https://vpngate.net/en/{}", href);

                                                if let Ok(parsed_url) =
                                                    url::Url::parse(&complete_url)
                                                {
                                                    let mut vpn_info = VpnInfo {
                                                        country: country_text,
                                                        ip: String::new(),
                                                        tcp: String::new(),
                                                        udp: String::new(),
                                                        sid: String::new(),
                                                        hid: String::new(),
                                                    };

                                                    for (key, value) in parsed_url.query_pairs() {
                                                        match key.as_ref() {
                                                            "ip" => {
                                                                vpn_info.ip = value.to_string();
                                                            }
                                                            "tcp" => {
                                                                vpn_info.tcp = value.to_string();
                                                            }
                                                            "udp" => {
                                                                vpn_info.udp = value.to_string();
                                                            }
                                                            "sid" => {
                                                                vpn_info.sid = value.to_string();
                                                            }
                                                            "hid" => {
                                                                vpn_info.hid = value.to_string();
                                                            }
                                                            _ => {}
                                                        }
                                                    }
                                                    println!("{:?}", vpn_info);
                                                    if !vpn_info.ip.is_empty()
                                                        && !vpn_info.tcp.is_empty()
                                                        && !vpn_info.udp.is_empty()
                                                        && !vpn_info.sid.is_empty()
                                                        && !vpn_info.hid.is_empty()
                                                    {
                                                        let json_output =
                                                            serde_json::to_string(&vpn_info)?;
                                                        println!("{:?}", json_output);
                                                    }
                                                }
                                            }
                                        }
                                    }
                                    break;
                                }
                            }
                        }
                    }
                }
            }
        }
        Err(err) => {
            eprint!("Failed to fetch data: {}", err);
            return Err(Box::new(err));
        }
    }

    let imsi = Vec::new();
    Ok(imsi)
}
그리고 마지막으로 vpn_info를 serde_json으로 JSON 화 했습니다. 실행 결과를 볼까요?
Rust Actix-web server started at 127.0.0.1:8080
"do_openvpn.aspx?fqdn=vpn115620030.opengw.net&ip=211.46.22.50&tcp=1752&udp=1320&sid=1694096423632&hid=19512800"
VpnInfo { country: "Korea Republic of", ip: "211.46.22.50", tcp: "1752", udp: "1320", sid: "1694096423632", hid: "19512800" }
"{\"country\":\"Korea Republic of\",\"ip\":\"211.46.22.50\",\"tcp\":\"1752\",\"udp\":\"1320\",\"sid\":\"1694096423632\",\"hid\":\"19512800\"}"
어떤가요?
vpngate.net 사이트에서 우리가 원하는 데이트를 웹 스크래핑하는 데 성공했습니다.
이제 아까 한 개만 찾으라는 break 를 없애고 한국 서버 전체를 찾게끔 해야 하는데요.
그러면 데이터를 저장하기 위한 벡터가 필요합니다.
pub async fn scrape_vpn_info() -> Result<Vec<String>, Box<dyn std::error::Error>> {
    let mut vpn_info_vec = Vec::new();
위와 같이 scrape_vpn_info 함수의 시작 부분에 mutable 형식의 vpn_info_vec 이라는 빈 벡터를 만듭니다.
그리고 아래와 같이 해줍니다.
if !vpn_info.ip.is_empty()
    && !vpn_info.tcp.is_empty()
    && !vpn_info.udp.is_empty()
    && !vpn_info.sid.is_empty()
    && !vpn_info.hid.is_empty()
{
    let json_output =
        serde_json::to_string(&vpn_info)?;
    // println!("{:?}", json_output);

    // 아래와 같이 추가 벡터에 저장하는 코드를 작성합니다.
    vpn_info_vec.push(json_output);
}

}
}
}
// 밑에 break문을 없애야 합니다.
// 안 그러면 한 줄의 데이터만 뽑아내기 때문이죠.
//break;
마지막으로 break문을 주석처리해 주거나 아예 없애버리면 됩니다.
마지막으로 리턴값을 아래와 같이 벡터로 지정해 줍니다.
// let imsi = Vec::new();
// Ok(imsi)

 Ok(vpn_info_vec)
이제 main.rs 파일에서 리턴값을 손보면 됩니다.
#[get("/")]
async fn get_vpn_info() -> impl Responder {
    let vpn_info_result = scrape_vpn_info().await;

    match vpn_info_result {
        Ok(vpn_info_vec) => {
            let mut response = Vec::new();
            for vpn_info_json in &vpn_info_vec {
                if let Ok(parsed_json) = serde_json::from_str::<Value>(&vpn_info_json[..]) {
                    response.push(parsed_json);
                } else {
                    eprintln!("Failed to parse JSON data: {}", vpn_info_json);
                }
            }
            HttpResponse::Ok().json(response)
        }
        Err(err) => {
            eprintln!("Error: {}", err);
            HttpResponse::InternalServerError().body(format!("Error: {}", err))
        }
    }
}
get_vpn_info 함수를 위와 같이 바꿉니다.
브라우저에 JSON을 보내주는 코드입니다.
실행 결과를 볼까요?
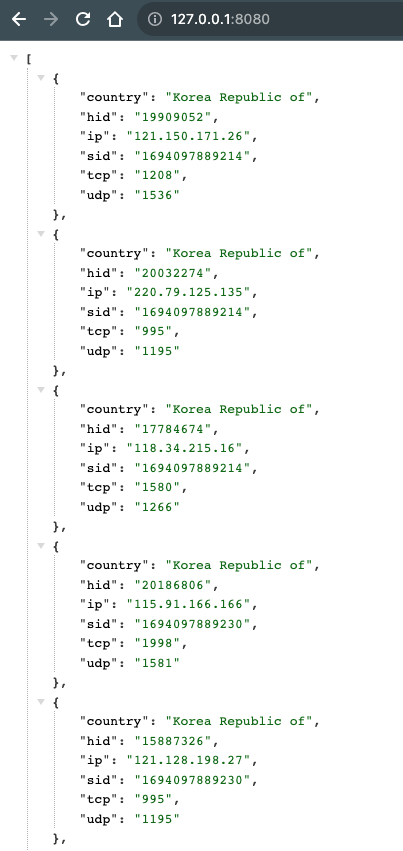
데이터가 아주 많이 로드되기 때문에 fetch에서 timeout이 날 수 있습니다.
몇 번의 새로 고침 만에 위와 같이 원하는 데이터를 JSON 형태로 완벽하게 받을 수 있었네요.
최종적으로 vpngate.net 사이트의 vpn 정보를 얻는 API를 완성한 형태가 되었습니다.
지금까지 러스트로 웹서버 만들기를 해봤는데요.
다음 시간에는 우리가 얻은 이 JSON 형태의 데이터를 브라우저에 보기 좋게 보여주는 작업을 해 보겠습니다.
참고로 아래는 my_scrape_lib/mod.rs 파일의 전체 코드입니다.
use serde::{Deserialize, Serialize};

#[derive(Serialize, Deserialize, Debug)]
pub struct VpnInfo {
    country: String,
    ip: String,
    tcp: String,
    udp: String,
    sid: String,
    hid: String,
}

async fn request_with_retry(url: &str) -> Result<String, reqwest::Error> {
    let client: reqwest::Client = reqwest::Client::builder()
        .timeout(std::time::Duration::from_secs(10))
        .build()?;

    loop {
        let response = client.get(url).send().await?;
        if response.status().is_success() {
            return Ok(response.text().await?);
        }
    }
}

pub async fn scrape_vpn_info() -> Result<Vec<String>, Box<dyn std::error::Error>> {
    let mut vpn_info_vec = Vec::new();

    match request_with_retry("https://www.vpngate.net/en/").await {
        Ok(body) => {
            let document = scraper::Html::parse_document(&body);
            // println!("{:?}", document);

            let my_table_selector = scraper::Selector::parse("#vg_hosts_table_id").unwrap();
            // println!("{:?}", my_table_selector);

            let mut table_count = 0;
            for table in document.select(&my_table_selector) {
                table_count += 1;
                if table_count == 3 {
                    // println!("{:?}", table);
                    let my_tbody_selector = scraper::Selector::parse("tbody").unwrap();
                    if let Some(tbody) = table.select(&my_tbody_selector).next() {
                        let my_tr_selector = scraper::Selector::parse("tr").unwrap();
                        for tr in tbody.select(&my_tr_selector) {
                            let my_td_selector = scraper::Selector::parse("td").unwrap();
                            if let Some(first_td) = tr.select(&my_td_selector).next() {
                                let country_text = first_td.text().collect::<String>();
                                if country_text == "Korea Republic of" {
                                    if let Some(seventh_td) = tr.select(&my_td_selector).nth(6) {
                                        let my_a_selector = scraper::Selector::parse("a").unwrap();
                                        if let Some(a) = seventh_td.select(&my_a_selector).next() {
                                            if let Some(href) = a.value().attr("href") {
                                                println!("{:?}", href);
                                                let complete_url =
                                                    format!("https://vpngate.net/en/{}", href);

                                                if let Ok(parsed_url) =
                                                    url::Url::parse(&complete_url)
                                                {
                                                    let mut vpn_info = VpnInfo {
                                                        country: country_text,
                                                        ip: String::new(),
                                                        tcp: String::new(),
                                                        udp: String::new(),
                                                        sid: String::new(),
                                                        hid: String::new(),
                                                    };

                                                    for (key, value) in parsed_url.query_pairs() {
                                                        match key.as_ref() {
                                                            "ip" => {
                                                                vpn_info.ip = value.to_string();
                                                            }
                                                            "tcp" => {
                                                                vpn_info.tcp = value.to_string();
                                                            }
                                                            "udp" => {
                                                                vpn_info.udp = value.to_string();
                                                            }
                                                            "sid" => {
                                                                vpn_info.sid = value.to_string();
                                                            }
                                                            "hid" => {
                                                                vpn_info.hid = value.to_string();
                                                            }
                                                            _ => {}
                                                        }
                                                    }
                                                    // println!("{:?}", vpn_info);
                                                    if !vpn_info.ip.is_empty()
                                                        && !vpn_info.tcp.is_empty()
                                                        && !vpn_info.udp.is_empty()
                                                        && !vpn_info.sid.is_empty()
                                                        && !vpn_info.hid.is_empty()
                                                    {
                                                        let json_output =
                                                            serde_json::to_string(&vpn_info)?;
                                                        println!("{:?}", json_output);
                                                        vpn_info_vec.push(json_output);
                                                    }
                                                }
                                            }
                                        }
                                    }
                                }
                            }
                        }
                    }
                }
            }
        }
        Err(err) => {
            eprint!("Failed to fetch data: {}", err);
            return Err(Box::new(err));
        }
    }

    Ok(vpn_info_vec)
}
그럼.
Rust 웹 서버 만들기 4편. SvelteKit으로 FrontEnd를 만들고 Actix-Web에서 직접 서빙(serving)하기
출처: https://mycodings.fly.dev/blog/2023-09-08-rust-web-server-add-ui-sveltekit-static-site
Rust 웹 서버 만들기 4편까지 왔습니다.
이게 마지막일 듯싶습니다.
지난 시간까지의 글 목록입니다.
Rust 웹 서버 만들기 1편. Actix Web 그리고 Fly.io에 배포하기
Rust 웹 서버 만들기 2편. Rust에서 Reqwest를 이용해서 HTTP 요청(Request)하기
Rust 웹 서버 만들기 3편. scraper를 이용해서 러스트로 웹 스크래핑하기
SvelteKit 설치
일단 저는 간단한 프로그램은 별도의 FrontEnd 서버를 만들지 않는데요.
지금 만드는 사이트가 그렇게 복잡하지도 않고, UI는 단순히 fetch만 하고 그 자료를 브라우저에 보여주면 되는 겁니다.
그러면 여기서 우리가 사용할 수 있는 FrontEnd 쪽 기술은 바로 Static Site가 되겠습니다.
Static Site로 유명한 게 Next.js 인데요.
저는 최근 공부하고 있는 SvelteKit으로 사용하겠습니다.
일단 다음과 같이 ui 폴더를 sveltekit 프로젝트 이름으로 만들겠습니다.
# Skeleton, Typescript를 골랐습니다.
npm create svelte@latest ui

cd ui

npx add-svelte@latest tailwindcss

npm install
바로 이어서 TailWindCSS도 설치했습니다.
SvelteKit을 index.html 파일이 있는 Static Site로 만들기
SvelteKit은 SSR(Server Side Rendering), SSG(Static Site Generation) 등 여러 가지를 할 수 있는데요.
이번 시간에는 SSG 부분입니다.
먼저, SSG에 맞는 sveltejs의 adapter를 설치해야 합니다.
npm i -D @sveltejs/adapter-static
이제 svelte.config.js 파일을 열어 다음과 같이 adapter를 바꿔주고 설정을 조금 추가합시다.
import adapter from '@sveltejs/adapter-static'
import { vitePreprocess } from '@sveltejs/kit/vite'

/** @type {import('@sveltejs/kit').Config} */
const config = {
  preprocess: [vitePreprocess({})],

  kit: {
    adapter: adapter({
      pages: 'build',
      assets: 'build',
      fallback: null,
      precompress: false,
      strict: true,
    }),
  },
}

export default config
위에서 설정 부분에 pages란 부분이 바로 index.html 파일이 생기게 되는 부분입니다.
Static Site라서 build 폴더만으로 HTTP 서빙할 수 있습니다.
index.html 파일이 있으니까요.
이제 마지막을 Static Site로 만드는 작업은 +layout.ts 파일에 prerender = true라고 명시하면 됩니다.
이때 +layout.ts 파일은 SvelteKit의 전체 레이아웃을 관장하는 백엔드 로직이 들어가는 코드입니다.
당연히 src 폴더 밑에 routes 폴더에 있어야 합니다.
이 +layout.ts 파일이 routes와 관련해서 제일 먼저 로딩됩니다.
export const prerender = true
그리고, TailwindCSS를 이용해서 모바일에도 적용되는 Responsive 디자인을 만들어 봅시다.
+layout.svelte 파일을 아래와 같이 수정해 줍시다.
<script>
  import "../app.postcss";
</script>

<div class="h-full min-h-screen w-full">
  <main class="flex w-full flex-col items-center"><slot /></main>
</div>
이제 +page.svelte 파일에다가 우리가 원하는 디자인과 코드를 작성해 볼까요?
SvelteJS에서 데이터 fetching 하기
백엔드에서 데이터를 불러올 때 주의해야 할 점이 바로 사용자에게 무언가 일어나고 있다고 알려줘야 합니다.
바로 로딩 스피너(loading spinner)를 제공해야 하는데요.
로딩 스피너가 없으면 느린 인터넷에선 사용자가 아무런 반응이 없다고 판단해 바로 뒤로 돌아가기 때문입니다.
그래서 SvelteJS에서 유명한 패키지 하나를 추가로 설치하겠습니다.
npm i -D svelte-loading-spinners
이제 본격적인 Data Fetching에 들어가 볼까요?
<script lang="ts">
  import { onMount } from "svelte";
  import { Circle } from "svelte-loading-spinners";

  type VPNINFOTYPE = {
    country: string;
    ip: string;
    tcp: string;
    udp: string;
    sid: string;
    hid: string;
  };

  let vpnInfos: Array<VPNINFOTYPE> = [];
  let isLoading = true; // 로딩 중인지 여부를 나타내는 상태 변수

  let apiUrl: string;
  if (import.meta.env.MODE === "production") {
    apiUrl = "/api/get-vpn";
  } else {
    apiUrl = "http://127.0.0.1:8080/api/get-vpn";
  }

  async function getVpnInfo() {
    try {
      const results = await fetch(apiUrl, {mode: "cors"});
      vpnInfos = await results.json();
      isLoading = false;
    } catch (error) {
      console.error("Failed to fetch data:", error);
      isLoading = false;
    }
  }

  onMount(async () => {
    await getVpnInfo();
  });
</script>
UI 쪽에서 Client가 브라우저를 로드했을 때 바로 시작되는 onMount 함수를 이용했습니다.
apiUrl은 개발 모드, 프로덕션 모드에 따라 바뀌게 될 거고요.
그리고 getVpnInfo 함수로 실제 데이터를 fetching 했고 그걸, 리액티브 변수인 vpnInfos에 저장했습니다.
React에서는 useState를 써야 하는데요.
SvelteJS에서는 그냥 선언한 변수는 모두 리액티브 변수가 됩니다.
이제 UI 코드를 작성해 볼까요?
<section class="bg-white">
  <div
    class="py-4 px-4 mx-auto max-w-screen-xl lg:py-16 grid lg:grid-cols-2 gap-8 lg:gap-16"
  >
    <div class="flex flex-col justify-center">
      <h1
        class="mb-4 text-4xl font-extrabold tracking-tight leading-none text-gray-900 md:text-5xl lg:text-6xl"
      >
        Welcome to my OpenVpn Site.
      </h1>
      <p class="mb-2 text-lg font-normal text-gray-500 lg:text-xl">
        This website is a mirror site of <span class="underline"
          ><a href="https://www.vpngate.net/en/">www.vpngate.net</a></span
        ><br />
        I created it myself because the original site is very inconvenient to view
        on mobile devices.
      </p>
    </div>
  </div>
</section>

{#if isLoading}
  <!-- 로딩 중일 때 화면에 로딩 스크린을 표시 -->
  <div class="flex items-center justify-center w-full pb-4">
    <Circle size="60" color="#3b3b40" unit="px" duration="1s" />
  </div>
{:else}
  <!-- 데이터가 로딩된 후 화면에 데이터를 표시 -->
  <div class="flex w-full flex-col md:p-4 lg:w-10/12">
    <h1 class="text-2xl font-bold dark:text-white pl-4 pb-2">VPN Lists</h1>
    <div
      class="grid grid-cols-2 gap-4 sm:grid-cols-3 md:grid-cols-3 lg:grid-cols-4 2xl:grid-cols-5"
    >
      {#each vpnInfos as vpnInfo}
        <div
          class="max-w-sm p-6 border border-gray-200 rounded-lg shadow bg-white"
        >
          <h3 class="mb-2 text-md font-bold tracking-tight text-gray-900">
            {vpnInfo.country}
          </h3>

          <ul class="pb-2 text-sm">
            <li>
              {vpnInfo.ip}
            </li>
            <li>
              TCP {vpnInfo.tcp}
            </li>
            <li>
              UDP {vpnInfo.udp}
            </li>
          </ul>
          <div class="flex flex-row">
            {#if vpnInfo.tcp !== "0"}
              <a
                href={`https://www.vpngate.net/common/openvpn_download.aspx?sid=${vpnInfo.sid}&tcp=1&host=${vpnInfo.ip}&port=${vpnInfo.tcp}&hid=${vpnInfo.hid}`}
                class="text-white bg-[#050708] hover:bg-[#050708]/80 focus:ring-4 focus:outline-none focus:ring-[#050708]/50 font-medium rounded-lg text-sm px-4 py-2 text-center inline-flex items-center mr-2 mb-2"
              >
                TCP
              </a>
            {/if}
            {#if vpnInfo.udp !== "0"}
              <a
                href={`https://www.vpngate.net/common/openvpn_download.aspx?sid=${vpnInfo.sid}&udp=1&host=${vpnInfo.ip}&port=${vpnInfo.udp}&hid=${vpnInfo.hid}`}
                class="text-white bg-gray-500 hover:bg-gray-500/80 focus:ring-4 focus:outline-none focus:ring-gray-500/50 font-medium rounded-lg text-sm px-4 py-2 text-center inline-flex items-center mr-2 mb-2"
              >
                UDP
              </a>
            {/if}
          </div>
        </div>
      {/each}
    </div>
  </div>
{/if}
SvelteJS의 템플릿에 따라 적절하게 UI를 꾸몄습니다.
이제 테스트해 볼까요?
백엔드 쪽에서도 "cargo run"으로 서버를 실행해 주시고,
ui 폴더 안에서 "npm run dev"로 UI 쪽 개발 서버를 실행해 주시면 됩니다.
그런데, 아래 그림과 같이 작동하지 않네요.
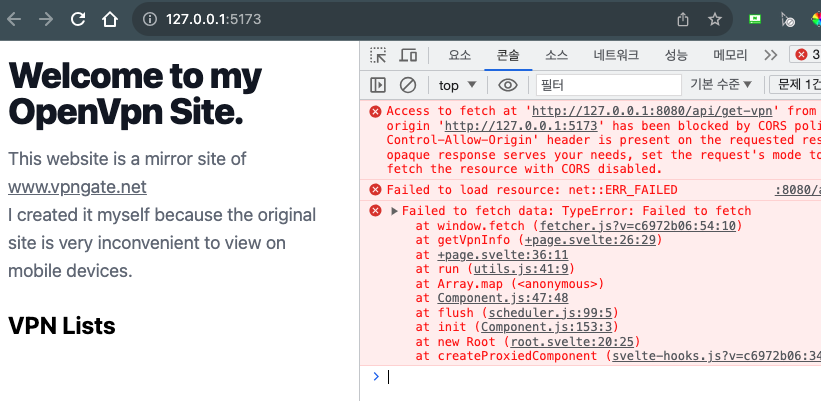
그 이유는 크롬 콘솔 창에 잘 나와 있습니다.
바로 CORS 때문인데요.
크로스 오리진 정책입니다.
기본적으로 서로 다른 도메인 간 데이터 교환이 불가한데요.
이걸 CORS인데요. 그래서 no-cors 설정이 필요합니다.
참고로, 러스트 백엔드는 8080 포트고, 프론트엔드인 SvelteKit은 5173 포트이니까요.
Actix-Web에 Cors 관련 처리 해주기
러스트 서버와 UI 서버간 데이터 교환이 안될 겁니다.
바로 Cors 때문인데요.
Actix-Web에는 actix-cors 패키지가 있습니다.
우리는 이걸 이용할 건데요.
일단 먼저, 설치해야 합니다.
cargo add actix-cors
이제, Rust의 main.rs 파일에 아래와 같이 Cors 처리를 해주면 됩니다.
use actix_cors::Cors;

#[actix_web::main]
async fn main() -> std::io::Result<()> {
    println!("Rust Actix-web server started at 127.0.0.1:8080");

    HttpServer::new(|| {
        let cors = Cors::default()
            .allow_any_origin()
            .allowed_methods(vec!["GET", "POST"])
            .allowed_headers(vec![http::header::AUTHORIZATION, http::header::ACCEPT])
            .allowed_header(http::header::CONTENT_TYPE)
            .max_age(3600);

        App::new()
            .wrap(cors)  // 여기에 cors를 wrap 해야 합니다.
            .service(get_vpn_info)
            .service(healthcheck)
    })
    .bind(("127.0.0.1", 8080))?
    // .bind(("0.0.0.0", 8080))?
    .run()
    .await
}
allowed_methods에 보시면 허용되는 HTTP 메서드가 있는데요.
우리는 GET 메서드만 쓸 거라서 POST 메서드는 지워도 됩니다.
이제 다시 2개의 서버를 각각 돌려서 실행 결과를 볼까요?
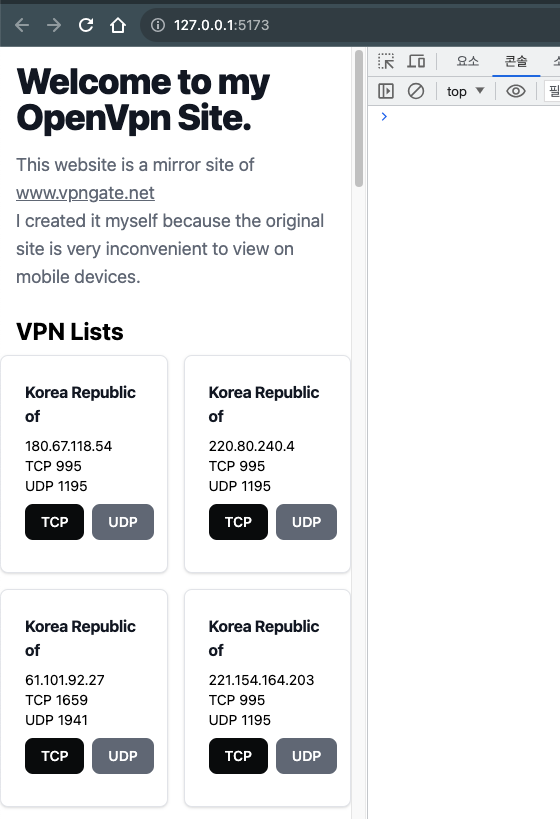
위 그림과 같이 콘솔 창에 아무런 에러도 없고, UI 부분도 잘 나오고 있습니다.
대 성공이네요.
또, 새로 고침 해보면 동그란 로딩 스피너가 작동할 겁니다.
SvelteKit Build 해보기
이제 UI 부분은 끝났으니까요, UI 부분을 정적 사이트로 빌드 해야 합니다.
npm run build
이렇게 하시면 아까 svelte.config.js 파일에서 설정했듯이 build 폴더에 파일이 생성됩니다.
➜  ui git:(master) ✗ cd build
➜  build git:(master) ✗ ls -al
total 16
drwxr-xr-x   5 cpro95  staff   160  9  8 19:52 .
drwxr-xr-x  17 cpro95  staff   544  9  8 19:52 ..
drwxr-xr-x   4 cpro95  staff   128  9  8 19:52 _app
-rw-r--r--   1 cpro95  staff  1571  9  8 19:52 favicon.png
-rw-r--r--   1 cpro95  staff  2419  9  8 19:52 index.html
➜  build git:(master) ✗
위와 같이 index.html 파일이 생성됐습니다.
이제 이 파일을 직접 serve 해볼까요?
➜  build git:(master) ✗ serve .
 UPDATE  The latest version of `serve` is 14.2.1

   ┌────────────────────────────────────────────┐
   │                                            │
   │   Serving!                                 │
   │                                            │
   │   - Local:    http://localhost:3000        │
   │   - Network:  http://192.168.29.145:3000   │
   │                                            │
   │   Copied local address to clipboard!       │
   │                                            │
   └────────────────────────────────────────────┘
serve 는 npm 패키지입니다.
"npm i -g serve"로 글로벌하게 설치하시면 언제든지 사용할 수 있습니다.
포트 3000으로 가볼까요?
아래 그림과 같이 데이터를 Fetching 하지 못하고 있네요.

걱정하지 마십시오.
이건 아까 svelte 코드에서 apiUrl을 개발 모드, 배포모드에 따라 주소를 달리 했기 때문입니다.
우리가 포트 3000으로 서빙하는 건 배포모드이기 때문에 현재 그 서버가 없는 거죠.
Rust에서 정적 파일 서빙하기
Actix-Web에서 정적 파일을 서빙하기 위해서는 Actix-files를 이용하면 됩니다.
cargo add actix-files
위와 같이 설치하시고 main.rs 파일을 아래와 같이 바꿔 주시면 됩니다.
mod my_scrape_lib;
use my_scrape_lib::scrape_vpn_info;

use actix_cors::Cors;
use actix_web::{get, http, App, HttpResponse, HttpServer, Responder};
use actix_files::Files;

...
...
// 중간 부분은 생략
...
...


#[actix_web::main]
async fn main() -> std::io::Result<()> {
    println!("Rust Actix-web server started at 127.0.0.1:8080");

    HttpServer::new(|| {
        let cors = Cors::default()
            .allow_any_origin()
            .allowed_methods(vec!["GET", "POST"])
            .allowed_headers(vec![http::header::AUTHORIZATION, http::header::ACCEPT])
            .allowed_header(http::header::CONTENT_TYPE)
            .max_age(3600);

        App::new()
            .wrap(cors)
            .service(get_vpn_info)
            .service(healthcheck)
            .service(Files::new("/", "ui/build").index_file("index.html"))
    })
    .bind(("127.0.0.1", 8080))?
    // .bind(("0.0.0.0", 8080))?
    .run()
    .await
}
Actix-Web에 service 개념으로 "ui/build" 폴더를 정적 사이트로 서빙하는데 찾는 파일이 index.html이라는 겁니다.
이제, 컴파일해 볼까요?
UI 쪽은 배포 모드로 한번 빌드 했기 때문에 UI 쪽 서버는 더 이상 돌릴 필요가 없습니다.
Rust 쪽 백엔드 서버만 돌리면 되죠.
http:/127.0.0.1:8080으로 들어가 볼까요?
위 그림과 같이 아주 잘 작동하고 있습니다.
Fly.io에 배포하기
이제 우리가 호스팅 하기로 했던 Fly.io에 배포해 보겠습니다
Fly.io에 배포하는 거는 실제 프로덕션 빌드기 때문에, 러스트에서 사용한 개발 서버 127.0.0.1을 바꿔저야 하는데요.
Fly.io에 배포되는 Docker파일에서 실제 실행되는 러스트 실행파일은 0.0.0.0 주소로 해야 됩니다.
그래야 작동이 되는데요.
main.rs 파일을 다시 바꾸겠습니다.
    // .bind(("127.0.0.1", 8080))?
    .bind(("0.0.0.0", 8080))?
    .run()
    .await
위와 같이 하시면 됩니다.
그리고 .dockerignore 파일에 ui/build 폴더가 들어가 있으면 안 됩니다.
우리의 서버는 프론트엔드를 로컬에서 직접 빌드해서 최종 정적 파일로 만들고 그걸, 그대로 서버로 올리는 거기 때문에,
.docerignore에 ui/build가 들어가 있으면 ui/build 폴더가 서버에 올라가지 않게 되는 거죠.
fly deploy
위와 같이 실행하시면 됩니다.
➜  rust-fly-test git:(master) ✗ fly deploy
==> Verifying app config
Validating /Users/cpro95/Codings/Rust/rust-fly-test/fly.toml
Platform: machines
✓ Configuration is valid
--> Verified app config
==> Building image
Remote builder fly-builder-snowy-sun-1195 ready
==> Building image with Docker
--> docker host: 20.10.12 linux x86_64
[+] Building 78.6s (15/15) FINISHED
 => [internal] load build definition from Dockerfile                          0.9s
 => => transferring dockerfile: 651B                                          0.9s
 => [internal] load .dockerignore                                             0.9s
 => => transferring context: 94B                                              0.9s
 => [internal] load metadata for docker.io/library/rust:latest                0.5s
 => [internal] load metadata for docker.io/library/ubuntu:22.04               0.5s
 => FROM docker.io/library/rust:latest                                        0.2s
 => => resolve docker.io/library/rust:latest                                  0.2s
 => [builder 1/4] FROM docker.io/library/rust:latest@sha256:8a4ca3ca75afbc9  13.6s
 => => resolve docker.io/library/rust:latest@sha256:8a4ca3ca75afbc97bcf5362e  0.0s
 => => sha256:9f13f5a53d118643c1f1ff294867c09f224d00edca21 64.11MB / 64.11MB  1.5s
 => => sha256:e13e76ad6279c3d69aa6842a935288c7db66878ec3 210.99MB / 210.99MB  2.8s
 => => sha256:f5b255a946cc52ffae479ef24bcde1d8454459f983 190.46MB / 190.46MB  2.7s
 => => sha256:8a4ca3ca75afbc97bcf5362e9a694fe049d15734fbbaf82b8b 988B / 988B  0.0s
 => => sha256:e18a590e3b63b971a1d5f9d91c89ac7d562a9c20279f87 1.38kB / 1.38kB  0.0s
 => => sha256:2274565811a0dd1d5fc49868fcbdae074ad2f42b1207a3 6.10kB / 6.10kB  0.0s
 => => sha256:012c0b3e998c1a0c0bedcf712eaaafb188580529dd02 49.56MB / 49.56MB  1.2s
 => => sha256:00046d1e755ea94fa55a700ca9a10597e4fac7c47be1 24.03MB / 24.03MB  0.6s
 => => extracting sha256:012c0b3e998c1a0c0bedcf712eaaafb188580529dd026a04aa1  1.9s
 => => extracting sha256:00046d1e755ea94fa55a700ca9a10597e4fac7c47be19d970a3  0.4s
 => => extracting sha256:9f13f5a53d118643c1f1ff294867c09f224d00edca21f56caa7  1.6s
 => => extracting sha256:e13e76ad6279c3d69aa6842a935288c7db66878ec3b7815edd3  4.6s
 => => extracting sha256:f5b255a946cc52ffae479ef24bcde1d8454459f9832876e8b3d  3.2s
 => [stage-1 1/4] FROM docker.io/library/ubuntu:22.04@sha256:aabed3296a3d45c  0.0s
 => [internal] load build context                                            60.7s
 => => transferring context: 87.07MB                                         60.7s
 => [builder 2/4] WORKDIR /usr/src/app                                        0.1s
 => [builder 3/4] COPY . .                                                    0.7s
 => [builder 4/4] RUN --mount=type=cache,target=/usr/local/cargo,from=rust:  15.3s
 => CACHED [stage-1 2/4] RUN useradd -ms /bin/bash app                        0.0s
 => CACHED [stage-1 3/4] WORKDIR /app                                         0.0s
 => [stage-1 4/4] COPY --from=builder /usr/src/app/rust-fly-test /app/rust-f  0.0s
 => exporting to image                                                        0.1s
 => => exporting layers                                                       0.1s
 => => writing image sha256:bddb01e433aa7d67840a325310078fb2e4dd0775a42ff7f7  0.0s
 => => naming to registry.fly.io/rust-web-app-tutorial:deployment-01H9TAK66R  0.0s
--> Building image done
==> Pushing image to fly
The push refers to repository [registry.fly.io/rust-web-app-tutorial]
08f3667d177c: Pushed
abd33ec8f1b9: Layer already exists
07f5e88cb1a8: Layer already exists
dc0585a4b8b7: Layer already exists
deployment-01H9TAK66R1HK83C4C03ETF2DH: digest: sha256:12c4587aecff26f31a73c8d7acfa98ca92eedf5b70fd67fd951dbf4c16e7663c size: 1154
--> Pushing image done
image: registry.fly.io/rust-web-app-tutorial:deployment-01H9TAK66R1HK83C4C03ETF2DH
image size: 94 MB

Watch your deployment at https://fly.io/apps/rust-web-app-tutorial/monitoring

Updating existing machines in 'rust-web-app-tutorial' with rolling strategy
  [1/1] Machine 6e82775c243987 [app] update finished: success
  Finished deploying

Visit your newly deployed app at https://rust-web-app-tutorial.fly.dev/
deploy가 성공됐다고 나오네요.
심지어 image size는 조금 무거운 ubuntu를 썼는데도 94MB밖에 안 됩니다.
이게 바로 Rust의 장점이죠.
이제 최종 주소인 https://rust-web-app-tutorial.fly.dev/로 가볼까요?
그런데, 이상합니다.
위와 같이 페이지를 찾을 수 없다고 나오네요.
그러면 api/get-vpn 주소로 가볼까요?
우리가 만든 api/get-vpn 주소도 작동하지 않습니다.
그럼 문제를 해결해 볼까요?
먼저, Fly.io 서버에 가볼까요?
fly ssh console
위와 같이 명령어를 입력하면 ssh 접속으로 Fly.io의 가상 머신 즉, 우분투 도커로 원격 접속하게 됩니다.
root@6e82775c243987:/app# ls -l
total 15944
-rwxr-xr-x 1 root root 16323656 Sep  8 12:01 rust-fly-test
root@6e82775c243987:/app#
위와 같이 rust-fly-test라고 러스트 파일을 컴파일한 최종 파일만 있습니다.
ui/build라는 우리의 Static Site가 없네요.
당연한 얘기지만 Dockerfile에서 실행파일만 /app 폴더로 복사했고 ui/build 폴더는 복사를 하지 않았네요.
아래와 같이 dockerfile에 ui/build를 복사하는 명령어를 추가합니다.
# Get compiled binaries from builder's cargo install directory
COPY --from=builder /usr/src/app/rust-fly-test /app/rust-fly-test
COPY --from=builder /usr/src/app/ui/build /app/ui/build
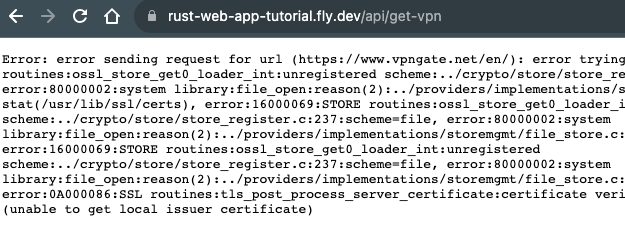
두 번째, 에러인 SSL 관련인데요.
이건 서버문제입니다.
ssl-certificate가 없어서 우리 서버에서 원격 서버인 vpngate.net으로 접속이 안되는 거죠.
http 말고 https 통신을 위해서는 SSL 인증이 있어야 하는데요.
Fly.io는 그 인증이 있습니다.
아마 우리가 도커로 사용한 우분투 문제인 거 같네요.
Dockerfile을 다음과 같이 수정합시다.
# Runtime image
FROM ubuntu:22.04

RUN apt-get update && apt-get install -y openssl ca-certificates
우분투를 설정할 때 openssl과 ca-certificates 패키지를 설치하라는 뜻입니다.
이제 다시 Fly.io에 fly deploy 해볼까요?
Deploy가 에러 나면 다시 fly deploy 해보시면 됩니다.
최종적으로 성공 메시지가 나왔네요.
이제 다시 한번 우리 주소인 https://rust-web-app-tutorial.fly.dev/로 가볼까요?
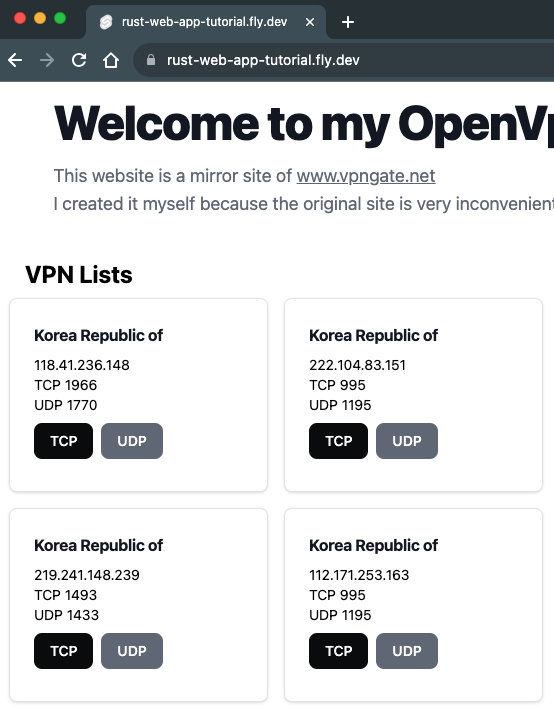
위 그림과 같이 대성공입니다.
데이터가 나오는 걸로 봐서는 api/get-vpn 라우팅도 잘 작동되고 있는 거죠.
지금까지 Rust로 웹서버 만들기를 해봤는데요.
이걸 기초로 해서 자신만의 웹 애플리케이션을 꼭 만들어 보시기 바랍니다.
그럼.
'생각 > 글쓰기' 카테고리의 다른 글
| 표준국어대사전과 우리말샘 차이 (0) | 2024.06.19 |
|---|---|
| 한글 배경 만들기 (0) | 2024.06.05 |
| WASM 세계에서 Rust GUI가 급성장중 (0) | 2024.05.13 |
| [띄어쓰기]'알'과 '수'를 띄어써야 하는 이유 (0) | 2024.05.10 |
| 단어와 단어 사이의 띄어쓰기 (1) | 2024.05.03 |
