출처: https://www.cyberciti.biz/faq/how-to-install-kvm-on-ubuntu-20-04-lts-headless-server/

We can use KVM to run multiple operating systems such as MS-Windows server/desktop, *BSD family of operating systems, various Linux distros using virtual machines. Each virtual machine has its own private disk, graphics card, a network card, hardware devices, and more.
| Requirements | Ubuntu Linux 20.04 LTS |
| Root privileges | Yes |
| Difficulty level | Intermediate |
| Est. reading time | 2 minutes |
Prerequisites to install KVM on Ubuntu 20.04 LTS headless server
I am assuming that:
- The host Ubuntu server located in the remote data center and it is a headless box.
- All commands in this tutorial typed over the ssh based session.
- You need a vnc client to install the guest operating system. However, this is not required if you use Cloud images.
- In this tutorial, you will learn how to install KVM software on Ubuntu 20.04 LTS server and use KVM to setup your first guest VM.
Find out if CPU support Intel VT/AMD-V virtualization for KVM
Run any one of the following command:
$ lscpu
## or ##
$ kvm-ok
INFO: /dev/kvm exists
KVM acceleration can be used
By default, many system manufacturers disables an AMD or Intel hardware CPU virtualization technology in the BIOS for KVM. You need to reboot the system and turn it in the BIOS.
Installing KVM on Ubuntu 20.04
Let us see how to install KVM on Ubuntu 20.04 LTS Linux server.
Step 1 – Install KVM on Ubuntu 20.04 LTS server
We need the following packages:
Package nameShort descriptionInstallation target/type| qemu-kvm | QEMU Full virtualization on x86 hardware | Headless server |
| libvirt-daemon-system | Libvirt daemon configuration files | Headeless server |
| libvirt-clients | Programs for the libvirt library | Headless server |
| virtinst | Programs to create and clone virtual machines | Headless server |
| libosinfo-bin | Tools for querying the osinfo database | Headless server |
| libguestfs-tools | Guest disk image management system and tools for Cloud images | Headless server |
| cpu-checker | tools to help evaluate certain CPU (or BIOS) features | Headless or GUI server |
| virt-manager | desktop application for managing virtual machines | Graphically/GUI server |
| ssh-askpass-gnome | interactive X program to prompt users for a passphrase for ssh-add | Graphically/GUI for remote server |
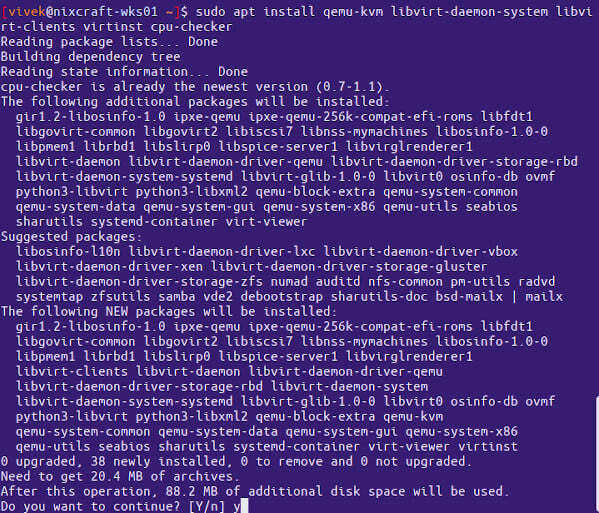
Execute the following apt command/apt-get command to install packages for headless server:
$ sudo apt install qemu-kvm libvirt-daemon-system libvirt-clients virtinst cpu-checker libguestfs-tools libosinfo-bin
Step 2 – Configure bridged networking on Ubuntu 20.04
By default, KVM installation creates “virbr0” bridge, and we can use the same for the outside world for communication. Let us find information about the “virbr0” bridge using the ip command:
$ ip link show master virbr0
$ bridge link show dev virbr0-nic
$ ip a s virbr0
We can set up br0 for direct IP assignment from our DHCP server on LAN or route IPv4/IPv6 address directly as follows:
Find your Ethernet device name
Type the following command and then note down Ethernet name:
$ nmcli connection show --active
Create a new network bridge named br0 using enp0s31f6
Run:
$ sudo nmcli con add ifname br0 type bridge con-name br0
$ sudo nmcli con add type bridge-slave ifname enp0s31f6 master br0
$ nmcli connection show
## SET UP IPv4 too as per your config ##
$ sudo nmcli connection modify br0 ipv4.addresses '192.168.2.25/24'
$ sudo nmcli connection modify br0 ipv4.gateway '192.168.2.254'
$ sudo nmcli connection modify br0 ipv4.dns '192.168.2.254'
$ sudo nmcli connection modify br0 ipv4.dns-search 'sweet.home'
$ sudo nmcli connection modify br0 ipv4.method manual
We can now either use br0 or virbr0 for guest VM networking.
Step 3 – Creating your first virtual machine (VM) guest
I am going to create a CentOS 8.x VM. First, grab CentOS 8.x latest ISO image:
$ cd /var/lib/libvirt/boot/
$ sudo wget https://mirrors.edge.kernel.org/centos/8/isos/x86_64/CentOS-8.2.2004-x86_64-dvd1.iso
Create CentOS 8 VM on Ubuntu 20.04 LTS
In this example, I’m creating a CentOS 8.x VM with 2GB RAM, 2 CPU core, 1 nic and 40GB disk space, enter:
$ export ISO="/var/lib/libvirt/boot/CentOS-8.2.2004-x86_64-dvd1.iso" # Installation media
$ export NET="br0" # bridge name
$ export OS="centos8" # os type
$ export VM_IMG="/var/lib/libvirt/images/centos8.qcow2" # VM image on disk
$ sudo virt-install \
--virt-type=kvm \
--name centos8 \
--ram 2048 \
--vcpus=2 \
--os-variant=${OS} \
--virt-type=kvm \
--hvm \
--cdrom=${ISO} \
--network=bridge=${NET},model=virtio \
--graphics vnc \
--disk path=${VM_IMG},size=40,bus=virtio,format=qcow2
Starting install...
Allocating 'centos8.qcow2'               |  40 GB  00:00:01
Domain installation still in progress. You can reconnect to
the console to complete the installation process.
To configure vnc login from another terminal over ssh and type:
$ sudo virsh dumpxml centos8 | grep vnc
<graphics type='vnc' port='5900' autoport='yes' listen='127.0.0.1'>
You can also use the following command:
$ sudo virsh vncdisplay centos8
Please note down the port value (i.e. 5900). You need to use an SSH client to set up tunnel and a VNC client to access the remote vnc server. Type the following SSH port forwarding command from your client/desktop:
$ ssh vivek@server1.cyberciti.biz -L 5900:127.0.0.1:5900
## OR FOR LAN ##
$ ssh vivek@192.168.2.25 -L 5900:127.0.0.1:5900
Once you have ssh tunnel established, you can point your VNC client at your own 127.0.0.1 (localhost) address and port 5900 as follows:
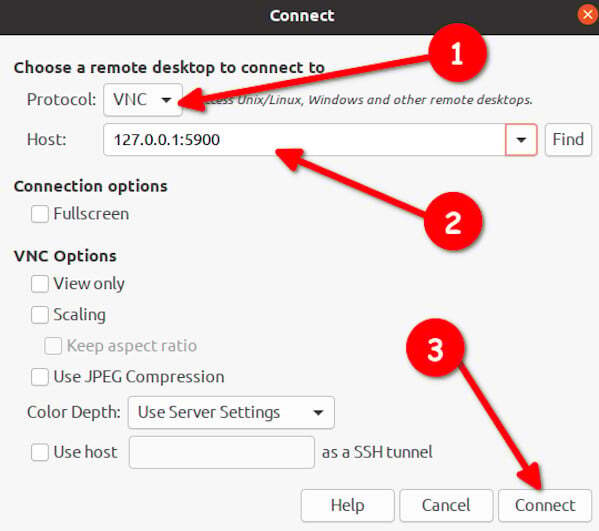
You should see CentOS Linux 8 VM/guest installation screen as follows on your Linux/macOS/Unix desktop:
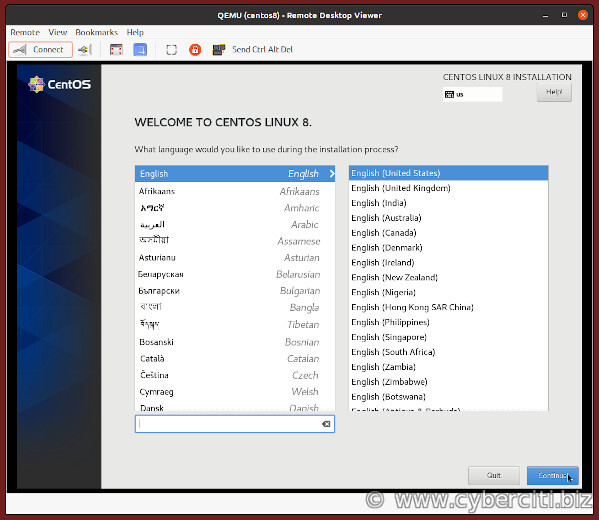
Now follow on-screen instructions and install CentOS 8 VM. Once installed, go ahead and click the reboot button. The remote server closed the connection to our VNC client. You can reconnect via KVM client to configure the rest of the server, including SSH-based session or firewall as described above.
Step 4 – Creating VM using virt-builder and cloud images
We can build virtual machine quickly on an Ubuntu 20.04 LTS server using the virt-builder command. To list images, run:
$ sudo virt-builder --list
# filter it using grep command/egrep command #
$ sudo virt-builder --list | egrep -i 'debian|ubuntu'
$ sudo virt-builder --list | egrep -i centos
Build Debian 10 LTS vm as follows on KVM. First, set shell variables:
export vm="debian-10-vm1"               # VM name
export os="debian-10"                   #  OS
export tz="Asia/Kolkata"                # Time zone
export ram="1024"                       # VM RAM
export disk="10G"                       # VM Disk Size
export vcpu="1"                         # Number of Virtual CPUs
export key=/home/vivek/.ssh/id_rsa.pub            # SSH Pub key
export pwd="Encrypted_PASSWORD_HERE"    # Use 'mkpasswd --method=sha512crypt' to create Encrypted password
export bridge="br0"                     # Network bridge name such as 'br0' or 'virbr0'
export ostype="debian10"                # Run 'osinfo-query os' to get exact variant
Now build virtual machine images quickly as per variables:
$ sudo virt-builder "${os}" \
--hostname "${vm}" \
--network \
--timezone "${tz}" \
--size=${disk} \
--format qcow2 -o /var/lib/libvirt/images/${vm}-disk01.qcow2 \
--update \
--firstboot-command "dpkg-reconfigure openssh-server" \
--firstboot-command "useradd -p ${pwd} -s /bin/bash -m -d /home/vivek -G sudo vivek" \
--edit '/etc/default/grub:s/^GRUB_CMDLINE_LINUX_DEFAULT=.*/GRUB_CMDLINE_LINUX_DEFAULT="console=tty0 console=ttyS0,115200n8"/' \
--ssh-inject "root:file:${key}" \
--run-command update-grub

Please note down the random root password. Now our custom VM image has been built with given options. Let us install VM:
Install VM
$ sudo virt-install --import --name "${vm}" \
--ram "${ram}" \
--vcpu "${vcpu}" \
--disk path=/var/lib/libvirt/images/${vm}-disk01.qcow2,format=qcow2 \
--os-variant "${ostype}" \
--network=bridge=${bridge},model=virtio \
--noautoconsole
Starting install...
Domain creation completed.
List all VMs:
$ sudo virsh list
Log in using console:
$ sudo virsh console ${vm}
Since we injected the ssh key, enter:
## this will only work if your br0 dhcpd also provide name resoution via dns ##
$ host $vm
$ ssh root@vm-ip-here
$ ssh root@${vm}
We can use virt-builder command to build a variety of VMs for local or cloud usage, usually within a few minutes or less. Then we use virt-install to install VM on Ubuntu 20.04 LTS headless server.
Step 5 – Using cloud images
The manual installation method is okay for learning purposes or for building a single VM. But do you need to deploy tons of VMs? Try cloud images. You can modify pre-built cloud images as per your needs. For example, we can add users, install ssh keys, setup time zone, and more using Cloud-init, which is the defacto multi-distribution package that handles early initialization of a cloud instance. Let us see how to create CentOS 8 VM using cloud images with 1024MB ram, 20GB disk space, and one vCPU.
Download CentOS 8 cloud image
$ sudo -i
# cd /var/lib/libvirt/boot
# wget https://cloud.centos.org/centos/8/x86_64/images/CentOS-8-GenericCloud-8.2.2004-20200611.2.x86_64.qcow2
# wget https://cloud.centos.org/centos/8/x86_64/images/CHECKSUM
# sha256sum --ignore-missing -c CHECKSUM
CentOS-8-GenericCloud-8.2.2004-20200611.2.x86_64.qcow2: OKUse the mkdir command to create required directories
# D=/var/lib/libvirt/images
# VM=centos8-vm1 ## your vm goes name ##
# mkdir -vp $D/$VM
mkdir: created directory '/var/lib/libvirt/images/centos8-vm1'
Create meta-data file
# cd $D/$VM
# vi meta-data
Append the following config:
instance-id: centos8-vm1
local-hostname: centos8-vm1
Create user-data file
I am going to login into VM using ssh keys. So make sure you have ssh-keys in place using the ssh-keygen command:
# ssh-keygen -t ed25519 -C "Ubuntu 20.04 host server login ssh key"
See “How To Set up SSH Keys on a Linux / Unix System” for more info. Edit user-data as follows:
# cd $D/$VM
# vi user-data
Add as follows (replace hostname, users, ssh-authorized-keys as per your setup):
#cloud-config

# Hostname management
preserve_hostname: False
hostname: centos8-vm1
fqdn: centos8-vm1.sweet.home

# Users
users:
    - default
    - name: vivek
      groups: ['wheel']
      shell: /bin/bash
      sudo: ALL=(ALL) NOPASSWD:ALL
      ssh-authorized-keys:
        - ssh-ed25519 AAAAC3NzaC1lZDI1NTE5AAAAIO4Owk8inCz5ZnhWSiP2Y5wfVKTFOLTFOJ0K/sC2egDF Ubuntu 20.04 host server login ssh key

# Configure where output will go
output:
  all: ">> /var/log/cloud-init.log"

# configure interaction with ssh server
ssh_genkeytypes: ['ed25519', 'rsa']

# Install my public ssh key to the first user-defined user configured
# in cloud.cfg in the template (which is centos for CentOS cloud images)
ssh_authorized_keys:
  - ssh-ed25519 AAAAC3NzaC1lZDI1NTE5AAAAIO4Owk8inCz5ZnhWSiP2Y5wfVKTFOLTFOJ0K/sC2egDF Ubuntu 20.04 host server login ssh key

# set timezone for VM
timezone: Asia/Kolkata

# Remove cloud-init
runcmd:
  - systemctl stop NetworkManager.service && systemctl start NetworkManager.service
  - dnf -y remove cloud-init
Validate user-data for syntax errors if any:
# cloud-init devel schema --config-file user-data
Valid cloud-config file user-data
Copy cloud image
# cd $D/$VM
# cp -v /var/lib/libvirt/boot/CentOS-8-GenericCloud-8.2.2004-20200611.2.x86_64.qcow $VM.qcow2
'/var/lib/libvirt/boot/CentOS-8-GenericCloud-8.2.2004-20200611.2.x86_64.qcow' -> 'centos8-vm1.qcow2'
Create 20GB disk image
# cd $D/$VM
# qemu-img create -f qcow2 -o preallocation=metadata $VM.new.image 20G
# virt-resize --quiet --expand /dev/sda1 $VM.qcow2 $VM.new.image
# mv -f $VM.new.image $VM.qcow2
# ls -l

Creating a cloud-init ISO file
# mkisofs -o $VM-cidata.iso -V cidata -J -r user-data meta-data
I: -input-charset not specified, using utf-8 (detected in locale settings)
Total translation table size: 0
Total rockridge attributes bytes: 331
Total directory bytes: 0
Path table size(bytes): 10
Max brk space used 0
183 extents written (0 MB)
Creating a pool
# virsh pool-create-as --name $VM --type dir --target $D/$VM
Pool centos8-vm1 created
Installing a CentOS 8 VM via cloud image
# cd $D/$VM
# virt-install --import --name $VM \
--memory 1024 --vcpus 1 --cpu host \
--disk $VM.qcow2,format=qcow2,bus=virtio \
--disk $VM-cidata.iso,device=cdrom \
--network bridge=br0,model=virtio \
--os-variant=rhel8.1 \
--graphics spice \
--noautoconsole
Delete unwanted files:
# cd $D/$VM
# virsh change-media $VM sda --eject --config
Successfully ejected media.
## use the rm command to deleted files ##
# rm -v meta-data user-data $VM-cidata.iso
removed 'meta-data'
removed 'user-data'
removed 'centos8-vm1-cidata.iso'
Find out an IP address of KVM VM named centos8-vm1
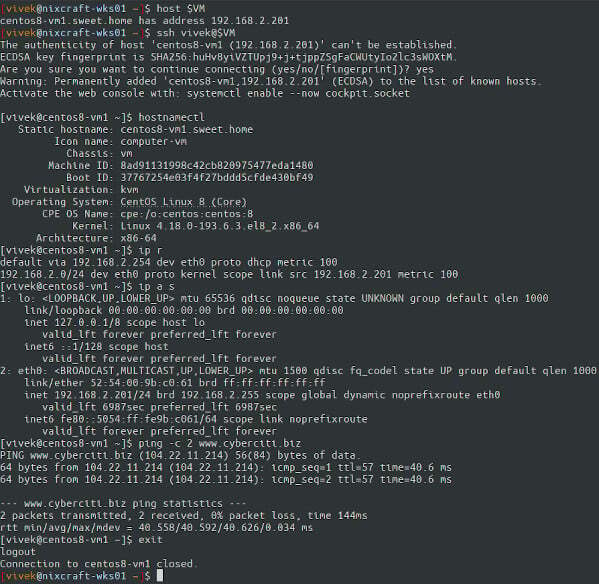
If you are using the ‘br0’ use the host command:
# host $VM
centos8-vm1.sweet.home has address 192.168.2.201
To find out an ip address of Linux KVM guest virtual machine when using the default virbr0 bride interface:
# virsh net-dhcp-leases default
Verification – Log in to centos8-vm
Use the ssh command:
# ssh vivek@$VM
# ssh vivek@192.168.2.201
A note about useful virsh KVM management commands
Let us see some useful commands for managing VMs.
List all VMs
# virsh list --all
Get VM info
# virsh dominfo vmName
# virsh dominfo centos8-vm1
Stop/shutdown a VM
# virsh shutdown centos8-vm1
Start VM
# virsh start centos8-vm1
Mark VM for autostart at CentOS 8 server boot time
# virsh autostart centos8-vm1
Reboot (soft & safe reboot) VM
# virsh reboot ubuntu-vm1
Reset (hard reset/not safe) VM [last resort]
# virsh reset ubuntu-vm1
Delete VM
# virsh shutdown centos8-vm1
# virsh undefine centos8-vm1
# virsh pool-destroy centos8-vm1
# D=/var/lib/libvirt/images
# VM=centos8-vm1.img
# rm -ri $D/$VM
To see a complete list of virsh command type
# virsh help | less
# virsh help | grep reboot
Conclusion
In this tutorial, you learned how to install KVM on an Ubuntu 20.04 LTS Linux server and provision new gust VM using the virt-install. Further, you learned quickly building new virtual machines using virt-builder. Please libvirt documentation and Linux KVM project documentation. KVM software has many more options. In other words, read the following man pages:
man virt-install
man virt-builder
man nmcli
man ip
man bridge
- How to install KVM on CentOS 7 / RHEL 7 Headless Server
- Install KVM on Ubuntu 16.04 LTS Headless Server
- Debian 9 - install KVM server headless server
- Reset root password for Linux KVM VM
- Clone existing KVM virtual machine images on Linux
- Reset a KVM clone virtual Machines with virt-sysprep on Linux
- KVM forward ports to guests VM with UFW on Linux
- Create VM using the qcow2 image file in KVM
- CentOS 8 KVM installation and configuration
- Ubuntu 20.04 KVM installation and configuration
'컴퓨터 활용(한글, 오피스 등) > 50_2.운영체제_리눅스' 카테고리의 다른 글
| 리눅스_OPENSTACK_KVM (0) | 2022.11.14 |
|---|---|
| 가상화_XEN KVM Docker Openstack (0) | 2022.11.14 |
| 리눅스_Openstack 설치계획서 (0) | 2022.11.12 |
| 리눅스_가상 네트워크 인터페이스 (0) | 2022.11.12 |
| 리눅스_우분투(Ubuntu) 가상머신(Virtual Machine) 서버 환경 구축 (0) | 2022.11.11 |


