출처: Installation: Tomcat 8 on CentOS 7 or RHEL Red Hat Enterprise Linux 7 - iGrafx Platform 17.0
Installation: Tomcat 8 on CentOS 7 or RHEL Red Hat Enterprise Linux 7
The configuration of 3rd party software i.e. Operating Systems, Databases, Application Server, etc., in the context of this documentation is for illustration purposes only. iGrafx doesn't imply that the provided examples are the best or only way of configuration for the described scenario. Nor can we guarantee that it is the best option for performance and security. You apply the instructions at your own risk, please consult an expert of the 3rd party software if you are not sure.
The installation of Apache Tomcat on CentOS and RHEL are the same. See https://en.wikipedia.org/wiki/Red_Hat_Enterprise_Linux to find out why.
Prerequisites
Java
Follow the instructions in Prerequisite: Java on Linux
Install wget
The following installation steps require the tomcat binaries to be transferred to your server. The following step is not required if you put the files to your server via a different method.
sudo yum -y install wgetInstall unzip
The following installation steps require to unzip a file, this is not required if you transfer an unzipped version to your server or use another decompression tool.
sudo yum -y install unzipSetup Tomcat
Create Group
For security purposes, Tomcat should be run as an unprivileged user (i.e. not root). Create a new user and group that will run the Tomcat service.
First, create a new tomcat group:
sudo groupadd tomcatCreate User
Then create a new tomcat user. This user is member of the tomcat group, with a home directory of /opt/tomcat (where we will install Tomcat), and with a shell of /bin/false (so nobody can log into the account):
sudo useradd -M -s /bin/nologin -g tomcat -d /opt/tomcat tomcatDownload Tomcat
Although a Tomcat package is provided in the YUM repositories, a manual installation is recommended to be in better control of the Tomcat version installed without being dependent on the yum repository
See http://tomcat.apache.org/download-80.cgi to check what version of tomcat is currently available and adjust the link information in the next commands to match the desired or latest release of Tomcat 8.
wget http://mirror.tcpdiag.net/apache/tomcat/tomcat-8/v8.0.33/bin/apache-tomcat-8.0.33.tar.gz
We're going to install Tomcat to the /opt/tomcat directory. Create the directory and extract the the archive to it with these commands.
sudo mkdir /opt/tomcat
sudo tar xvf apache-tomcat-8*tar.gz -C /opt/tomcat --strip-components=1
Update Permissions
The tomcat user that we set up needs to have access to the Tomcat installation.
Change to the Tomcat installation path.
cd /opt/tomcat
Then give the tomcat user write access to the conf directory, and read access to the files in that directory.
sudo chgrp -R tomcat conf
sudo chmod g+rwx conf
sudo chmod g+r conf/*
Make the tomcat user the owner of the webapps, work, temp, and logs directories.
sudo chown -R tomcat webapps/ work/ temp/ logs/Run tomcat as a service
We want to be able to run Tomcat as a service, we will set up a Tomcat Systemd unit file .
sudo vi /etc/systemd/system/tomcat.service
Paste in the following script. You may also want to modify the memory allocation settings that are specified in CATALINA_OPTS:
# Systemd unit file for tomcat
[Unit]
Description=Apache Tomcat Web Application Container
After=syslog.target network.target

[Service]
Type=forking

Environment=JAVA_HOME=/usr/lib/jvm/jre
Environment=CATALINA_PID=/opt/tomcat/temp/tomcat.pid
Environment=CATALINA_HOME=/opt/tomcat/
Environment=CATALINA_BASE=/opt/tomcat/
Environment='CATALINA_OPTS=-Xms512M -Xmx1024M -server -XX:+UseParallelGC'
Environment='JAVA_OPTS=-Djava.awt.headless=true -Djava.security.egd=file:/dev/./urandom'

ExecStart=/opt/tomcat/bin/startup.sh
ExecStop=/bin/kill -15 $MAINPID

User=tomcat
Group=tomcat

[Install]
WantedBy=multi-user.target
Save and exit. The script is telling the server to run the Tomcat service as the tomcat user, with the settings specified.
Now reload Systemd to load the Tomcat unit file.
sudo systemctl daemon-reload
Now you are able to start the Tomcat service with this systemctl command.
sudo systemctl start tomcat
To enable the Tomcat service to start on server boot, run this command.
sudo systemctl enable tomcatAccess the tomcat log file
The tomcat console output is helpful to verify that everything worked as planned. It is helpful to open a second ssh console and watch it while you start or stop tomcat via the startu.sh script or the service explained below.
tail -n 200 -f /opt/tomcat/logs/catalina.outFirewall
Open the port tomcat is running on.
sudo firewall-cmd --zone=public --add-port=8080/tcp --permanent
sudo firewall-cmd --reload
Configure Tomcat Web Management Interface
In order to use the manager webapp that ships with Tomcat, we must add a login to our Tomcat server. We will do this by editing the tomcat-users.xml file.
sudo vi /opt/tomcat/conf/tomcat-users.xml
This file is filled with comments which describe how to configure it. You may want to add a user who can access the manager-gui and admin-gui (webapps that come with Tomcat).
Do this by defining a user similar to the example below. Be sure to change the username and password to something secure. Note the <tomcat-users> section is already there, it should be enough to just insert the line specifying the user.
<tomcat-users>
    <user username="admin" password="password" roles="manager-gui,admin-gui"/>
</tomcat-users>
Save and quit the tomcat-users.xml file. To put our changes into effect, restart the Tomcat service.
sudo systemctl restart tomcatAccess the Web Interface
Now that Tomcat is up and running, let's access the web management interface in a web browser. In a browser go to your server name or IP address http://servername:8080
You will see something like the following image.

There are links to the admin webapps that we configured an admin user for.
Access the application manager
Let's take a look at the Manager App, accessible via the link or http://servername:8080/manager/html
You will be prompted for the username and password added to to user configuration file.

The Web Application Manager is used to manage your Java applications. You can Start, Stop, Reload, Deploy, and Undeploy here. You can also run some diagnostics. Information about your server is available at the very bottom of this page.
Access the host manager
Now let's take a look at the Host Manager, accessible via the link or http://servername:8080/host-manager/html
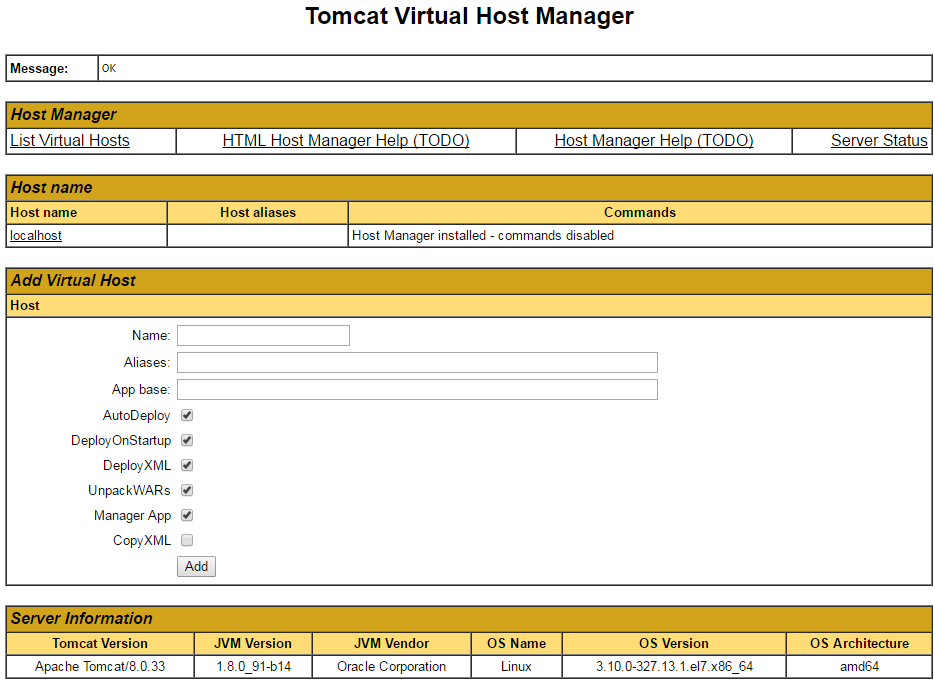
From the Virtual Host Manager page, you can add virtual hosts to serve your applications from.
Your initial installation is complete.
Next steps
After the initial installation is done you need to adjust your tomcat installation to server the primary purpose and make adjustment to the default configuration. In a test environment you can directly continue deploying the iGrafx platform application server. In a production environment you need make more adjustments to fit your needs, most of them are specific to your IT requirements and are beyond of the scope this documentation can deliver.
Deploy WAR file with Tomcat on Linux
Other useful commands
Check the process ID of tomcat.
ps -ef | grep tomcat
Check the ports of tomcat, replace 6645 by the process ID discuvered by the command above.
sudo netstat -lnp | grep 6645
Show the status of the tomcat service.
sudo systemctl status tomcat.service
Show the status of the tomcat process
ps aux | grep 'tomcatd'
This article contains
See also
Related articles
-
Page:
-
Page:
-
Page:
-
Page:
-
Page:
'컴퓨터 활용(한글, 오피스 등) > 50_2.운영체제_리눅스' 카테고리의 다른 글
| 서버/리눅스Cent OS 7.x Linux LVM (PV, VG, LV) 개념, 명령어 정리 (1) | 2023.10.08 |
|---|---|
| centos7에 apache tomcat 설치 (1) | 2023.10.08 |
| 레드햇 엔터프라이즈 리눅스 버전 이해 (1) | 2023.10.07 |
| How to Install Tomcat 7 on CentOS/RHEL 7/6/5 (0) | 2023.10.07 |
| 서버 네트워크 보안장비 설정 (0) | 2023.10.01 |


