[적용 가능]
In this guide, you will learn how to install Redmine on Ubuntu 22.04. Redmine is cross-platform and cross-database, flexible project management tool written on Ruby on Rails Framework.
Some of the main features of Redmine are:
- Multiple projects support
- Flexible role based access control
- Flexible issue tracking system
- Gantt chart and calendar
- News, documents & files management
- Feeds & email notifications
- Per project wiki
- Per project forums
- Time tracking
- Custom fields for issues, time-entries, projects and users
- SCM integration (SVN, CVS, Git, Mercurial and Bazaar)
- Issue creation via email
- Multiple LDAP authentication support
- User self-registration support
- Multilanguage support
- Multiple databases support
Read more about Redmine features on the features page.
Install Redmine on Ubuntu 22.04
Run system update
To begin with, ensure that your system packages are up-to-date.
apt updateRedmine is not available on the default Ubuntu 22.04.
Therefore, to install Redmine on Ubuntu 22.04, you need to build and install it from the source.
Install Required Build Tools and Dependencies
To install Redmine from the source code, you need install the required build tools and dependencies.
apt install build-essential ruby-dev libxslt1-dev libmariadb-dev libxml2-dev zlib1g-dev imagemagick libmagickwand-dev curl gnupg2 bison libbison-dev libgdbm-dev libncurses-dev libncurses5-dev libreadline-dev libssl-dev libyaml-dev libsqlite3-dev sqlite3 -yInstall Apache HTTP Server on Ubuntu 22.04
Install Apache web server and Apache modules for the Passenger, lightweight web server for Ruby.
apt install apache2 libapache2-mod-passengerStart and enable Apache to run on system boot.
systemctl enable --now apache2Install Ruby interpreter
Redmine version 5.0.0 supports Ruby 3.0.
Ruby is installed as part of the above package dependencies. To check the current version of installed Ruby;
ruby -vruby 3.0.2p107 (2021-07-07 revision 0db68f0233) [x86_64-linux-gnu]Create Redmine System User
Create a Redmine system user that can be used to install Redmine Ruby dependencies via bundler command. Set its home directory to /opt/redmine as this is where we will install Redmine app.
참고: --------------
sudo adduser redmine
sudo mkdir /opt/redmine
sudo chown redmine:redmine /opt/redmine
cd /opt/redmine
su redmine
-------------------
useradd -r -m -d /opt/redmine -s /usr/bin/bash redmine
Add Apache web server user to Redmine group.
usermod -aG redmine www-dataAlso, add redmine user to RVM group;
usermod -aG rvm redmine참고-------------
Install RVM- Ruby Version Manager
Another way to install Ruby on our Ubuntu 22.04 is using another command-line tool called RVM– Ruby Version Manager.
Ruby Version Manager in short RVM, is a software platform developed to manage multiple installations of Ruby on the same device that includes the entire ruby environment including the Ruby interpreter and installed RubyGems. This helps the developers to easily switch between different Ruby versions as per the requirement of different projects.
Install Dependencies:
sudo apt install curl g++ gcc autoconf automake bison libc6-dev libffi-dev libgdbm-dev libncurses5-dev libsqlite3-dev libtool libyaml-dev make pkg-config sqlite3 zlib1g-dev libgmp-dev libreadline-dev libssl-devInstall GPG key
gpg --keyserver hkp://pgp.mit.edu --recv-keys 409B6B1796C275462A1703113804BB82D39DC0E3 7D2BAF1CF37B13E2069D6956105BD0E739499BDBGet RVM:
curl -sSL https://get.rvm.io | bash -s stableAfter that source the variables:
source ~/.rvm/scripts/rvm-----------------------
Install MariaDB on Ubuntu 22.04
Run the command below to install MariaDB database server on Ubuntu 22.04
apt install mariadb-serverMariaDB is started and enabled to run on boot upon installation. If not already started, run the command below to start it;
systemctl enable --now mariadbRun initial MariaDB database secure script to remove default databases, test tables, disable remote root login,
mysql_secure_installationCreate Redmine Database and Database User
Once MariaDB is installed, login as root user and create Redmine database and database user.
Replace the names of the database and the database user accordingly.
mysql -u root -pcreate database redminedb;grant all on redminedb.* to redmineuser@localhost identified by 'P@ssW0rD';예시: grant all on redminedb.* to redmineuser@localhost identified by 'redmine';
Reload privilege tables and exit the database.
flush privileges;
quit
Download and Install Redmine
Navigate Redmine releases page and grab Redmine tarball for the current stable release version.
You can simply download and extract the Redmine tarball to the Redmine install directory, /opt/redmine.
VER=5.0.0curl -s https://www.redmine.org/releases/redmine-$VER.tar.gz | sudo -u redmine tar xz -C /opt/redmine/ --strip-components=1예시: curl -s https://www.redmine.org/releases/redmine-5.0.0.tar.gz | sudo -u redmine tar xz -C /opt/redmine/ --strip-components=1
Configuring Redmine on Ubuntu 22.04
Once you have installed Redmine under the /opt/redmine directory, you can now proceed to configure it.
Create Redmine configuration file by renaming the sample configuration files as shown below;
su - redminecp /opt/redmine/config/configuration.yml{.example,}cp /opt/redmine/public/dispatch.fcgi{.example,}cp /opt/redmine/config/database.yml{.example,}Configure Redmine Database Settings
Open the created Redmine database configuration setting and set the Redmine database connection details for MySQL.
vim /opt/redmine/config/database.yml...
production:
adapter: mysql2
database: redminedb
host: localhost
username: redmineuser
password: "P@ssW0rD"
# Use "utf8" instead of "utfmb4" for MySQL prior to 5.7.7
encoding: utf8mb4
...
Save and exit the file.
Install Redmine Ruby Dependencies
Logout as redmine user by running the exit.
exitAs privileged user, navigate to Redmine install directory and install the Ruby dependencies.
cd /opt/redmineInstall Bundler for managing gem dependencies.
sudo gem install bundlerNext, install the required gems dependencies as redmine user.
su - redminebundle config set --local path 'vendor/bundle'bundle installAlso update the gems;
bundle updateInstall updated io-wait and strscan gems;
sudo chown -R /var/lib/gems myuser
gem install io-wait strscan참고---------
오류
ERROR: While executing gem ... (Gem::FilePermissionError)
You don't have write permissions for the /var/lib/gems/3.0.0 directory.
해결
sudo chown -R redmine /var/lib/gems
해결 방법 설명
I don’t think introducing rvm is a good idea as it is another tool to learn and manage.
The comment as above is that the user does not have access to write to here, only read:
/var/lib/
This is secure by design.
sudo
One option as mentioned above is
sudo gem install GEM
But that is insecure and not recommended. For example, some malicious code in the gem or a subdepedency could install malware or wipe the hard drive, using root access.
chmod
An alternative, if you have the ability to run sudo, is to allow all users other than root to write to that gems directory.
sudo chmod +w /var/lib
You might have to run that on gems with that or use a recursive flag.
Then, without sudo, install there.
gem install GEM
While that command can’t wipe your hard drive or anything else as root, it can install malicious software in that shared directory across users.
User level
The safest without having to use sudo at all is:
gem install GEM --user-install
Which installs to somewhere like ~/.gem depending on your OS or version or Ruby.
And it keeps your user’s gems independent of the root gems or shared gems.
Local project
I would avoid installing Jekyll using the gem command. As then you have a global Jekyll that might clash between projects that need 3.8 or 3.9 or 4.1
So rather add Jekyll to project specific gems in Gemfile
bundle add jekyll
That will add to Gemfile and install Jekyll.
Alt
BTW the Mac instructions suggest passing a flag -n to install in /usr/local/bin
해결 사례
$ sudo apt-get install ruby-full
Ruby를 처음 설치하고 gem update를 하면 Ruby: You don't have write permissions for the /var/lib/gems/2.7.0 directory.와 같이 권한이 없다면서 실행을 거부한다.
sudo gem update을 입력하면 당장의 문제는 해결이 되지만 좋은 방법은 아니다.
아래와 같이 환경변수를 추가하면 문제가 해결된다.
echo '# Install Ruby Gems to ~/gems' >> ~/.bashrc
echo 'export GEM_HOME="$HOME/gems"' >> ~/.bashrc
echo 'export PATH="$HOME/gems/bin:$PATH"' >> ~/.bashrc
source ~/.bashrc
위 스크립트를 복사해 명령창에 실행시킨다.
$ gem update
$ gem install jekyll bundler
환경변수 설정이 끝나면 update와 install 모두 잘 된다.
-----------------------
redmine 계정에서
Generate Secret Session Token
To prevent tempering of the cookies that stores session data, you need to generate a random secret key that Rails uses to encode them.
bundle exec rake generate_secret_tokenCreate Database Schema Objects
Create Rails database structure by running the command below;
RAILS_ENV=production bundle exec rake db:migrateOnce the database migration is done, insert default configuration data into the database by executing;
RAILS_ENV=production REDMINE_LANG=en bundle exec rake redmine:load_default_data/opt/redmine/config/database.yml 파일의 Production 내용과 연결됨
장애---------------
Error: Mysql2::Error: Table 'redminedb.roles' doesn't exist
해결----------------
mariaDB(또는 mysql)은 UTF-8을 사용하므로
/opt/redmine/config/database.yml 에서
encoding 을 "encoding: utf8mb4 -> encoding: utf8" 로 변경하고 다음을 재 수행함
RAILS_ENV=production bundle exec rake db:migrate
RAILS_ENV=production REDMINE_LANG=en bundle exec rake redmine:load_default_data
-----------------------
You can safely ignore the Ruby warnings.
Configure FileSystem Permissions
Ensure that the following directories are available on Redmine directory, /opt/redmine.
- tmp and tmp/pdf
- public and public/plugin_assets
- log
- files
If they do not exist, simply create them and ensure that they are owned by the user used to run Redmine.
for i in tmp tmp/pdf public/plugin_assets; do [ -d $i ] || mkdir -p $i; donechown -R redmine:redmine files log tmp public/plugin_assetschmod -R 755 /opt/redmineTesting Redmine Installation
The setup of Redmine on Ubuntu 22.04 is now done. Redmine listens on TCP port 3000 by default. Hence, before running the tests, open port 3000/tcp on firewall if it is running.
redmine@ubuntu20:~$ exitsudo ufw allow 3000/tcpYou can now test Redmine using WEBrick by executing the command below;
su - redminebundle exec rails server -u webrick -e productionSample output;
=> Booting WEBrick
=> Rails 6.1.4.7 application starting in production http://0.0.0.0:3000
=> Run `bin/rails server --help` for more startup options
[2022-03-29 13:48:36] INFO  WEBrick 1.7.0
[2022-03-29 13:48:36] INFO  ruby 3.0.2 (2021-07-07) [x86_64-linux-gnu]
[2022-03-29 13:48:36] INFO  WEBrick::HTTPServer#start: pid=14297 port=3000
Navigate to the browser and enter the address, http://server-IP-or-Hostname:3000. Replace the server-IP-or-Hostname accordingly.
If all is well, you should land on Redmine web user interface.

Configure Apache for Redmine on Ubuntu 22.04
Now that you have confirmed that Redmine is working as expected, proceed to configure Apache to server Redmine.
Create Redmine Apache VirtualHost configuration file.
exitcat > /etc/apache2/sites-available/redmine.conf << 'EOL'
Listen 3000
<VirtualHost *:3000>
ServerName redmine.kifarunix-demo.com
RailsEnv production
DocumentRoot /opt/redmine/public
<Directory "/opt/redmine/public">
Allow from all
Require all granted
</Directory>
ErrorLog ${APACHE_LOG_DIR}/redmine_error.log
CustomLog ${APACHE_LOG_DIR}/redmine_access.log combined
</VirtualHost>
EOL
Check Apache configuration for errors.
apachectl configtestSyntax OKEnsure that Passenger module is loaded;
apache2ctl -M | grep -i passengerpassenger_module (shared)If not enabled, run the command below to enable it.
a2enmod passengerEnable Redmine site.
sudo a2ensite redmineDisable default site;
a2dissite 000-default.confReload Apache
sudo systemctl restart apache2Check to ensure that Redmine is now listening on port 3000.
sudo lsof -i :3000COMMAND PID USER FD TYPE DEVICE SIZE/OFF NODE NAME
apache2 16419 root 6u IPv6 225133 0t0 TCP *:3000 (LISTEN)
apache2 16441 www-data 6u IPv6 225133 0t0 TCP *:3000 (LISTEN)
apache2 16442 www-data 6u IPv6 225133 0t0 TCP *:3000 (LISTEN)
apache2 16443 www-data 6u IPv6 225133 0t0 TCP *:3000 (LISTEN)
apache2 16444 www-data 6u IPv6 225133 0t0 TCP *:3000 (LISTEN)
apache2 16445 www-data 6u IPv6 225133 0t0 TCP *:3000 (LISTEN)
Access Redmine on Browser
Next, you can now access and sign in to Redmine on browser using the address http://server-IP-address:3000.
Default credentials: admin:admin.
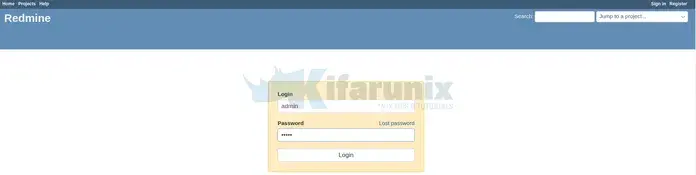
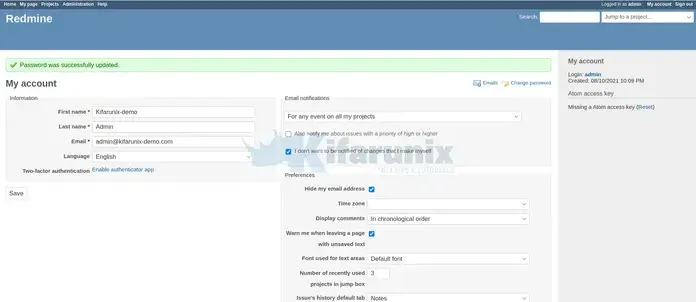
When prompted, reset your admin password.
Setup your Redmine profile;
Create Projects
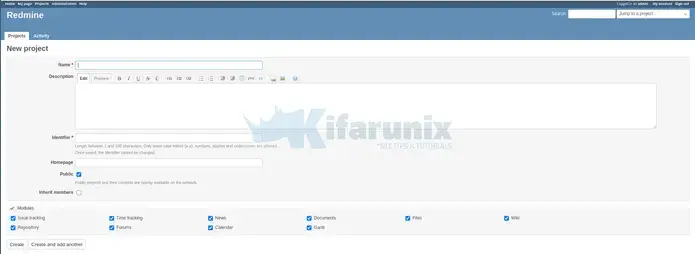
That concludes our guide on how to install Redmine on Ubuntu 22.04. You can now explore this awesome tool.
Read more on how to use Redmine User Guide.
Reference
Other Tutorials
---------------------------------------------------------------------------------------------------------------
출처: https://gist.github.com/manchot0/de951ec938c9a1dac458
Source : http://www.redmine.org/projects/redmine/wiki/RedmineInstall
Source : http://www.redmine.org/projects/redmine/wiki/HowTo_Install_Redmine_on_Ubuntu_step_by_step
Source : http://www.redmine.org/projects/redmine/wiki/Download
Source : https://www.phusionpassenger.com/library/config/apache/reference/#passengerruby
1 Dependance:
sudo apt-get install apache2 php5 mysql-server mysql-client phpmyadmin libmysqlclient-dev imagemagick libmagickwand-dev unzip git
after ruby installed :
sudo apt-get install libapache2-mod-passenger
2 Redmine :
sudo adduser redmine
sudo mkdir /opt/redmine
sudo chown redmine:redmine /opt/redmine
cd /opt/redmine
su redmine
wget http://www.redmine.org/releases/redmine-2.6.7.zip
unzip redmine-2.6.7.zip
mv redmine-2.6.7.zip redmine
cd redmine
cp config/database.yml.example config/database.yml
vi config/database.yml #Config de la BDD
gem install bundler
gem install rak
bundle install --without development test
bundle exec rake generate_secret_token
RAILS_ENV=production bundle exec rake db:migrate
RAILS_ENV=production REDMINE_LANG=fr bundle exec rake redmine:load_default_data
sudo vi /etc/apache2/mods-enabled/passenger.conf
PassengerDefaultRuby /usr/local/rvm/wrappers/ruby-2.1.5/ruby
PassengerDefaultUser www-data
sudo ln -s /opt/redmine/redmine/public /var/www/redmine
------------------------------------------------------------------------
3 Ways to Install Ruby on Ubuntu 22.04 LTS Jammy
Learn the different commands and steps to install Ruby on Ubuntu 22.04 LTS Jammy JellyFish using the command terminal.
Ruby is an object-oriented high-level interpreted programming language that is easy to use and productive to use. Inventor Yukihiro Matsumoto wanted to develop a language in which functional and imperative programming is balanced, hence, this dynamic, free and object-oriented programming language Ruby enjoys great popularity among programmers.
Everything in Ruby is an object that allows any programmer to customize the language to their preferences. In contrast to some others, the syntax is easier to read and write. It is similar to C and Java, so Java and C programmers can easily learn Ruby.
An extensive Online Documentation introduces newcomers to ruby syntax. Many Ruby projects are in the RubyForge, where you can also search for new libraries.
It offers a powerful package manager for distributing Ruby programs and libraries, in a standalone format called “gem”, as well as tools to easily manage the installation of gems on a server. Ruby programmers also have access to the powerful features of RubyGems.
Ruby supports all major platforms such as Windows, Mac, and Linux.
Steps to install Ruby on Ubuntu 22.04 LTS
There are three simple ways to install Ruby on Ubuntu Linux here we show all of them. Also, the steps are given here can be used for other Ubuntu versions such as 20.04/18.04 including other Linux – Mint, Debian, Elementary OS, MX Linux, POP_OS, and more…
#1st method using Ubuntu standard repository
1. Run system update
Let’s first run the system update command that will let our system’s package manager know about the latest packages available through the system repositories.
sudo apt update
2. Install Ruby on Ubuntu 22.04
Yes, we can install Ruby programming language using Ubuntu’s default repository, however, the version of it will not be the latest one instead of the well stable and tested because Ubuntu 22.04 is a Long Term supported version. Hence, if you want to get the Ruby without adding any extra repo, then use the given command:
sudo apt install ruby-full
Once the installation is completed, we can check the version using:
ruby --version
#2nd method using Rbenv
3. Install Rbenv
Rbenv is a command-line tool that lets us manage multiple Ruby versions and switch between them. We can also use it to install the latest versions of Ruby using the ruby-build plugin.
Install required dependencies:
sudo apt install git curl autoconf bison build-essential libssl-dev libyaml-dev libreadline6-dev zlib1g-dev libncurses5-dev libffi-dev libgdbm6 libgdbm-dev libdb-devGet Rbenv installation script:
curl -fsSL https://github.com/rbenv/rbenv-installer/raw/HEAD/bin/rbenv-installer | bashAdd a directory path that holds Rbenv files to your system path to use its command-line tool:
echo 'export PATH="$HOME/.rbenv/bin:$PATH"' >> ~/.bashrcecho 'eval "$(rbenv init -)"' >> ~/.bashrcsource ~/.bashrcTo check the installed version:
rbenv -v
4. Install Ruby using Rbenv
Now, Rbenv is ready to use on your Ubuntu 22.04 system, we can use it to list and install any latest version of Ruby on our system.
To list the available versions to install we can use:
rbenv install -l
To install the any of the listed versions we can use the given syntax:
rbenv install versionReplace the “version” in the above syntax with the one you want to install. For example, if you want to install 3.1.2 then the command will be:
rbenv install 3.1.2
How to set the system-wide default Ruby version:
As we know we can use rbenv to install and manage multiple versions of Ruby. Therefore, if you have the more than two versions on your system and want to set one of them as your system’s default version then the syntax is:
rbenv global versionReplace the “version” with what you want to set as the system-wide default one.
For example:
rbenv global 3.1.2To remove any ruby version:
rbenv uninstall version
#3rd method using Install Ruby Using RVM- Ruby Version Manager
5. Install RVM- Ruby Version Manager
Another way to install Ruby on our Ubuntu 22.04 is using another command-line tool called RVM– Ruby Version Manager.
Ruby Version Manager in short RVM, is a software platform developed to manage multiple installations of Ruby on the same device that includes the entire ruby environment including the Ruby interpreter and installed RubyGems. This helps the developers to easily switch between different Ruby versions as per the requirement of different projects.
Install Dependencies:
sudo apt install curl g++ gcc autoconf automake bison libc6-dev libffi-dev libgdbm-dev libncurses5-dev libsqlite3-dev libtool libyaml-dev make pkg-config sqlite3 zlib1g-dev libgmp-dev libreadline-dev libssl-devInstall GPG key
gpg --keyserver hkp://pgp.mit.edu --recv-keys 409B6B1796C275462A1703113804BB82D39DC0E3 7D2BAF1CF37B13E2069D6956105BD0E739499BDBGet RVM:
curl -sSL https://get.rvm.io | bash -s stableAfter that source the variables:
source ~/.rvm/scripts/rvm
6. Get Ruby language on Ubuntu 22.04
Finally, we can use RVM to install available Ruby versions, to list them we can use the given command:
rvm list known
To install any specific version listed after running the previous command, you can use:
rvm install ruby-versionReplace “version” in the above command with the one you want to install, for example, let’s say you want to have 3.1.2
rvm install ruby-3.1.2Whereas to simply install whatever the latest version is available, use:
rvm install rubyHow to use RVM to set a specific Ruby version as the system’s default one;
rvm --default use ruby-versionReplace “version” in the above command with the one you want to install
To remove any ruby version:
rvm remove ruby-version
7. Uninstall or remove
As per the method you have used to install Ruby, you can remove the same using the given commands:
To remove APT installed Ruby
sudo apt remove ruby-fullTo remove Rbenv
rm -rf ~/.rbenvTo remove RVM
rvm implode
rm -rf ~/.rvm
rm -rf /etc/rvmrc
rm -rf ~/.rvmrc
Other Articles:
• How to Install Maven on Ubuntu 22.04 LTS Jammy
• How to install CUDA on Ubuntu 20.04 LTS…
• Ubuntu 22.04 Remote Desktop Access from Windows…
• 4 Ways to install Firefox browser on Ubuntu 22.04…
'컴퓨터 활용(한글, 오피스 등) > 50_2.운영체제_리눅스' 카테고리의 다른 글
| 리눅스_우분투_두루팔9 설치 (1) | 2022.12.01 |
|---|---|
| 리눅스_쉘 스크립트_반복문(for 문) (0) | 2022.12.01 |
| 리눅스_SSH 22포트로 LOGIN시 Access denied가 뜰 때 (1) | 2022.11.29 |
| 리눅스_명령어 모음 (0) | 2022.11.26 |
| 리눅스_웹/리눅스 서버에서의 TLS / SSL 버전 확인 및 설정 (0) | 2022.11.26 |
